7. Simple Graphical User Interfaces
To a true artist only that face is beautiful which, quite apart from its exterior, shines with the truth within the soul.
7.1. Problem: Codon extractor
Recall from Chapter 5 that we can record DNA as a
sequence of nucleotide bases A, C, G, and T. Using this idea, we can
represent any sequence of DNA using a String made up of those four
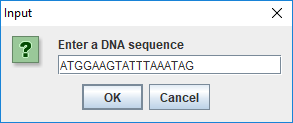
letters such as "ATGGAAGTATTTAAATAG".
This particular sequence contains 18 bases and six codons. A codon is a three-base subsequence in DNA. Biologists are interested in dividing DNA into codons because a single codon usually maps to the production of a specific amino acid. Amino acids, in turn, are the building blocks of proteins. The DNA sequence above contains the six codons ATG, GAA, GTA, TTT, AAA, and TAG.
We want to write a program that extracts codons from DNA
sequences entered by the user. The program must detect and inform the
user of invalid DNA sequences (those containing letters other than the
four bases). If the user enters a DNA sequence whose length is not a
multiple of three, the final codon should be written with one or two
asterisks (*), representing the missing bases.
With your knowledge of String manipulation and loops, this problem
should be easy. However, we want to solve it with a graphical user
interface, not with the command line interaction we’ve emphasized in
previous chapters. That is, the input step should be done with a window
that looks similar to the following.
And the corresponding output should look very much like this.

7.2. Concepts: User interaction
Many computer programs communicate with a human user. There are at least
two ways in which this communication can happen. One way is to use
command line input and output. In this case, a program prompts the user
for an input and the user responds through the keyboard, usually
completing the response by pressing the <return> or <enter> key.
Another way to communicate is to use a graphical user interface or GUI.
(Some people pronounce “GUI” to sound like “gooey,” but others say
“G-U-I.”) In this case, the program displays a window consisting of
one or more widgets, such as a button labeled “OK” or a text box in
which the user can type some text. Widgets (also known as controls) can
include buttons, labels, text areas, check boxes, menus, and many other
pre-defined objects for user interaction. While the program waits for
the user or does something in the background, the user has the option of
using a combination of the keyboard and the mouse to respond to the
program. While command line interfaces were dominant until the mid-70s,
GUIs have become the prime mode of communication between a program and a
human user. This chapter focuses on the design of simple GUIs using a
few built-in Java classes. Chapter 15 introduces more advanced tools for constructing complex
GUIs.
Figure 7.1(a) shows a Java application interacting with a user through a command line interface. The application asks the user for a temperature value in degrees Fahrenheit, converts it to the equivalent Celsius, and displays it. Figure 7.1(b) shows a similar application interacting with the user through a GUI. In this case, the application creates a window with six widgets (two labels, two text boxes, and two buttons). The user enters a temperature value in the text box below either the Celsius label or the Fahrenheit label and presses the appropriate Convert button. Then, the application displays the equivalent temperature in the other text box.

We describe the GUIs we introduce in this chapter as simple because
several aspects of GUI creation are hidden by the methods we use.
For example, these GUIs do not require the programmer to handle the
details of events such as a user pressing an “OK” button or typing
text into a text box and pressing the <enter> key. These events will
be handled automatically by existing libraries.
Chapter 15 discusses the
creation of more complex GUIs that require the programmer to program
event handling explicitly.
7.3. Syntax: Dialogs and the JOptionPane class
JOptionPane is a utility class for creating GUIs consisting
of a single dialog. It offers a variety of ways to create useful dialogs
quickly and easily and is part of the larger Java Swing GUI library. In
this chapter, we’ll show you how to use the static methods and
constants in JOptionPane to construct useful dialogs. Specifically,
you’ll learn how to construct the following four types of dialogs.
- Information
-
An information, or message, dialog displays a message to the user. Static method
showMessageDialog()creates such a dialog. See Figure 7.2 for an example of a message dialog. - Confirm
-
A confirm dialog asks a user to confirm a statement. Static method
showConfirmDialog()creates such a dialog. This dialog may return user input asYES_OPTION,NO_OPTION,OK_OPTION, orCANCEL_OPTION. See Figure 7.4 for an example of a Yes-No dialog. - Option
-
An option dialog asks the user to select one from an arbitrary set of options. Static method
showOptionDialog()creates such a dialog. See Figure 7.5 for an example. - Input
-
An input dialog is useful for obtaining data provided by the user. Static method
showInputDialog()creates such a dialog. The user can input aStringthat might represent a number, a name, or any arbitrary text. See [inputDialogFigure] for an example.
The JOptionPane class can be used to create both modal and
non-modal dialogs. A modal dialog is one that forces the user to
interact with the dialog before the program can continue. Thus, the
dialog is dismissed and the program execution resumes only after the
user has responded. Modal dialogs are useful in situations where user
input is required for the program to continue.
A non-modal dialog is one that’s displayed on the screen and doesn’t
require the user to interact with it for the underlying program to
proceed. It’s easy to create a modal dialog using the static methods in
the JOptionPane class mentioned earlier. Creation of non-modal dialogs
requires a bit more effort and is not covered in this chapter. In the
remainder of this chapter we show how to use JOptionPane to create
various types of modal dialogs.
7.3.1. Generating an information dialog
Programs often need to generate a message for the user and request a
response. The message might be a short piece of information, and the
only response might be “OK.” Alternatively, the message might be more complex and
require a more thoughtful response. In this section, we show how the
Java utility class JOptionPane can generate a simple dialog whose sole
purpose is to inform the user that a task has been completed.
Program 7.1 creates a dialog to inform the user that the task it was assigned to perform is now complete. Figure 7.2 shows the dialog generated by this program.
import javax.swing.*; (1)

public class SimpleDialog {
    public static void main(String [] args) {
        JOptionPane.showMessageDialog(null, (2)
            "Task completed. Click OK to exit.",
            "Simple Dialog", JOptionPane.INFORMATION_MESSAGE);
        System.out.println("Done."); (3)
    }
}| 1 | We import classes used in this program. The swing package
contains a number of classes needed to create a GUI, and JOptionPane
is one such class. |
| 2 | These lines use a static
method to create a modal dialog. JOptionPane is a utility class, and
showMessageDialog() is a static method in this class. This method,
along with the other three JOptionPane methods we discuss in this
chapter, is a factory method, meaning that it creates a new object (in
this case some kind of dialog object) on the fly with specific
attributes. In this example, the program informs the user that a
task has been completed. The method has the following four parameters.
|
| 3 | We display a message on the terminal which isn’t
needed in this program but illustrates an interesting point. When
you run SimpleDialog, you’ll notice that the "Done." message
displays on the terminal only after you’ve clicked the “OK” button.
This modal behavior blocks execution of the thread that generated it until
the button is pressed. |
In Figure 7.2 the dialog titled “Simple Dialog” includes an icon, a message, and a button labeled “OK.” This dialog is actually a frame, which is what windows are called in Java. We’ll discuss frames in greater detail in Section 15.3.

JOptionPane.The appearance of the dialog may be different on your computer. Even though Java is platform independent, GUIs are customized based on the OS you’re running. Each OS has a default look and feel (L & F) manager that specifies how widgets look and behave in your program. You can change the L & F manager, but not all managers are available on all operating systems.
In the previous example, we displayed a message of type
INFORMATION_MESSAGE. There are additional message types that could be
used.
-
ERROR_MESSAGE -
PLAIN_MESSAGE -
QUESTION_MESSAGE -
WARNING_MESSAGE
When used as parameters in showMessageDialog(), the constants above
cause different default icons to be displayed in the dialog box.
Figure 7.3 shows dialogs generated by
showMessageDialog() when using JOptionPane.ERROR_MESSAGE, (left)
and JOptionPane.WARNING_MESSAGE (right). Note the difference in the
icons displayed toward the top left of the two dialogs.
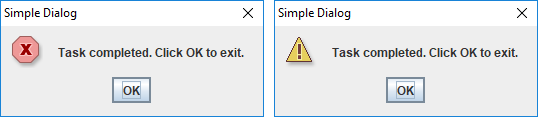
JOptionPane.ERROR_MESSAGE, and the right uses JOptionPane.WARNING_MESSAGE. The only difference is the icon displayed.7.3.2. Generating a Yes-No confirm dialog
There are situations when a program needs to obtain a binary answer from the user, a “yes” or a “no.” The next example shows how to generate such a dialog and how to get the user’s response.
Consider a program that checks whether a student understands the
difference between odd and even integers. The program generates a random
integer x, presents it to the user, and asks the question,
“Is x an odd integer?” The answer given by the user is
checked for correctness, and the user is informed accordingly.
Program 7.2 shows how to use the JOptionPane class
to generate a dialog for such an interaction.
import javax.swing.*;
import java.util.*;

public class OddEvenTest {
    public static void main(String [] args) {
        String title = "Odd Even Test";
        Random random = new Random(); (1)
        int x = random.nextInt(10);
        String question = "Is " + x + " an odd integer?";
        int response = JOptionPane.showConfirmDialog(null, (2)
            question, title, JOptionPane.YES_NO_OPTION);
        String message;
        // Response is YES_OPTION for yes, NO_OPTION for no
        if((response == JOptionPane.YES_OPTION && x % 2 != 0) ||
            (response == JOptionPane.NO_OPTION && x % 2 == 0))
            message = "You're right!";
        else
            message = "Sorry, that's incorrect.";
        JOptionPane.showMessageDialog(null, message, title, (3)
            JOptionPane.INFORMATION_MESSAGE);
    }
}| 1 | We declare a random number generator named random and then use it to generate a random number from 0 to 9. |
| 2 | We present the number to the user. Note
the use of JOptionPane.YES_NO_OPTION as the last parameter in the
showConfirmDialog(). The generated
dialog is shown in Figure 7.4(a). The call to
showConfirmDialog() returns the
JOptionPane.YES_OPTION or the JOptionPane.NO_OPTION value
depending on whether the user clicked the “Yes” or “No” button. |
| 3 | A second dialog is shown with a message dependent on whether the user gives the correct answer. The two different versions of this dialog are shown in Figure 7.4(b) and (c). |

JOptionPane. (b) Dialog in response to correct answer. (c) Dialog in response to incorrect answer.Because we used YES_NO_OPTION, the dialog in
Example 7.3 automatically generates two buttons
labeled “Yes” and “No.” Dialogs can also use the
YES_NO_CANCEL_OPTION to generate a dialog with “Yes,” “No,” and
“Cancel” options. The return value from showConfirmDialog() is
CANCEL_OPTION if the user presses the “Cancel” button.
7.3.3. Generating a dialog with a list of options
The JOptionPane class can also be used to generate an arbitrary set of
options as shown in the next example.
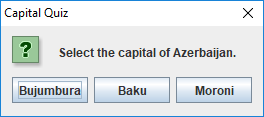
Consider a program that asks the user to select the correct capital of a country from a list of capitals. It shows three options and asks the user to select one from among the three. It then checks the user response for correctness and displays a suitable message.
import javax.swing.*;

public class CapitalQuiz {
    public static void main(String[] args) {
        String title = "Capital Quiz";
        String country = "Azerbaijan";
        String[] capitals = {"Bujumbura","Baku", "Moroni"};
        int correct = 1; //Baku is the correct answer
        String question = "Select the capital of " + country + ".";
        int response = JOptionPane.showOptionDialog(null, (1)
            question, title, JOptionPane.PLAIN_MESSAGE,
            JOptionPane.QUESTION_MESSAGE, null, capitals, null);
        //Response is 0, 1, or 2 for the three options
        String message;
        if(response == correct)
            message = "You're right!";
        else
            message = "Sorry, the capital of " + country +
				" is " + capitals[correct] + ".";
        JOptionPane.showMessageDialog(null, message, title, (2)
            JOptionPane.INFORMATION_MESSAGE);
    }
}| 1 | We call the showOptionDialog() method to create a dialog with multiple options. In our case, the options are three names of capitals, and only one of them is correct. Figure 7.5 shows the dialog created.The showOptionDialog() method creates an options dialog, which is the most complicated (but also the most flexible) of all the dialogs. The array of String values provided as the second to last parameter to showOptionDialog() gives the labels for the buttons.There are three null values passed into this method. The first one functions like the null used in Program 7.2, specifying that the default frame should be used. The second specifies that the default icon should be used. In the next section, we’ll show how to specify a custom icon. The last parameter indicates the default button, which will have focus when the dialog is created. If the user hits <enter> instead of clicking, the button with focus is the button that will be pressed. |
| 2 | As in Program 7.2, a second dialog is shown with a message dependent on whether the user gives the correct answer. |
7.3.4. Generating a dialog with a custom icon
A custom icon can be included in any dialog. Each of the methods in
JOptionPane introduced earlier can take an icon as a parameter. The
next example illustrates how to do so.
Program 7.4 shows how to use
showMessageDialog() to generate a message dialog with a custom icon.
import javax.swing.*;

public class CustomIconDialog{
    public static void main(String [] args){
        String file = "bat.png";
        String title = "Custom Icon";
        String message = "Some bats eat 3,000 mosquitoes a night.";
        JOptionPane.showMessageDialog(null, message, title,
            JOptionPane.INFORMATION_MESSAGE, new ImageIcon(file)); (1)
    }
}| 1 | The last parameter creates a new ImageIcon object from the file String ("bat.png" in this case). The resulting dialog appears in Figure 7.6. |
Dialogs illustrated in earlier examples can also use an icon parameter to include a custom icon.
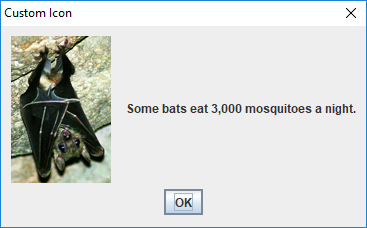
Note that the icon shown above will not appear when you run this code
unless you have a copy of bat.png in the appropriate directory.
7.3.5. Generating an input dialog
An input dialog can read text data from the user. The
showInputDialog() method in the JOptionPane class allows us to
create such a dialog. We introduced the showInputDialog() method in
Section 2.3, but we give two more examples here to
emphasize its similarity to the other JOptionPane factory methods and
to show off some of its additional features.
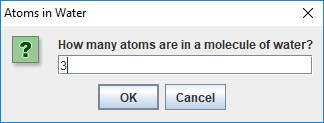
We want to write a program that asks a question about basic chemistry. Program 7.5 shows how to display a question, obtain an answer from the user, check for the correctness of the answer, and report back to the user.
import javax.swing.*;

public class ChemistryQuizOne {
    public static void main(String [] args) {
        String title = "Atoms in Water";
        String query = "How many atoms are in a molecule of water?";
        String response = JOptionPane.showInputDialog(null, (1)
            query, title, JOptionPane.QUESTION_MESSAGE);
        int answer = Integer.parseInt(response); (2)
        String message;
        if(answer == 3) (3)
            message = "You're right!";
        else
            message = "Sorry, that's incorrect.";
        JOptionPane.showMessageDialog(null, message, title, (4)
            JOptionPane.INFORMATION_MESSAGE);
    }
}| 1 | We use the showInputDialog() method to generate the dialog shown in Figure 7.7. This method returns a String named response containing the text entered by the user in the dialog box. |
| 2 | We convert this String to an int and save it into variable answer. |
| 3 | We check this value against the correct answer. |
| 4 | The showMessageDialog() method informs the user whether or not the answer is correct. |
It’s important to note that the user could type any sequence of
characters in the dialog box. Try running
Program 7.5 and see what happens when you type
“two,” instead of the number “2,” into the dialog box and press the
“OK” button. The program will generate an exception indicating that
the input String cannot be converted to an integer.
In Example 7.6 the user is required to enter text. To reduce input errors, we can restrict the user to
picking from a predefined list. We can create this list by generating an
array and supplying it as a parameter to the showInputDialog() method.
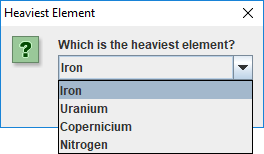
Program 7.6 displays a list of chemical elements and asks the user to select the heaviest.
import javax.swing.*;

public class ChemistryQuizTwo {
    public static void main(String [] args) {
        String title = "Heaviest Element";
        String query = "Which is the heaviest element?";
        String[] elements = {"Iron", "Uranium", "Copernicium", "Nitrogen"};
        String response = (String)JOptionPane.showInputDialog(null, (1)
            query, title, JOptionPane.QUESTION_MESSAGE, null, elements, null);
        String message;
        if(response.equals("Copernicium")) (2)
            message = "You're right!";
        else
            message = "Sorry, correct answer: Copernicium.";
        JOptionPane.showMessageDialog(null, message, title, (3)
            JOptionPane.INFORMATION_MESSAGE);
    }
}| 1 | We pass an array of four String values to the showInputDialog() method. Note that the last parameter to this method is null indicating that no specific item on the list should be selected by default. (In this case, the first item in the list is initially selected.) The generated dialog is shown in Figure 7.8. The four elements are contained in a drop-down list.Unlike Example 7.6, the return value from showInputDialog() is now of type Object, not of type String. The type of the list required by the method is Object array. You’re allowed to pass a String array to a method that wants an Object array due to inheritance, which is further discussed in
Chapter 11 and Chapter 17. The return value is the specific object from the array that was passed in. In our case, it has to be a String, but the compiler isn’t smart enough to figure that out. For this reason, we cast the object to a String before using the equals() method. |
| 2 | We check this String for correctness. |
| 3 | As before, the showMessageDialog() method informs the user whether or not the answer is correct. |
Note that this program will crash if the user clicks the “Cancel” button,
since null will be returned and stored into response.
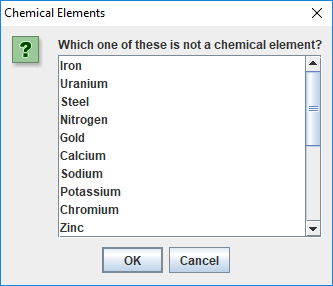
When the number of elements in the list supplied to the
showInputDialog() is 20 or more, a JList object is automatically
used to display the items as shown in
Figure 7.9.
Other than a longer list, the code in this example is virtually identical to the code in Program 7.6.
7.4. Solution: Codon extractor
Here we give the solution to the codon extractor problem posed at the
beginning of the chapter. As we have done throughout this chapter, we
start with the import needed for GUIs built on the Swing framework. Next
we begin the CodonExtractor class and its main() method. For
readability, the solution to this problem is divided into methods that
each do a specific task. We hope that the way a method works is
intuitively clear to you. If not, the next chapter explains them in
detail.
import javax.swing.*;

public class CodonExtractor {
    public static void main(String [] args) {
        int continueProgram;
        do { (1)
            // Read DNA sequence
            String input = JOptionPane.showInputDialog("Enter a DNA sequence"); (2)
            input = input.toUpperCase(); (3)
            String message = "Do you want to continue?";
            if(isValid(input)) (4)
                displayCodons(input); (5)
            else
                message = "Invalid DNA Sequence.\n" + message;
            continueProgram = JOptionPane.showConfirmDialog((6)
                null, message, "Alert", JOptionPane.YES_NO_OPTION);
        } while(continueProgram == JOptionPane.YES_OPTION);
        JOptionPane.showMessageDialog(null, "Thanks for using the Codon Extractor!");
}| 1 | The main() method contains a do-while loop that allows the user to
enter sequences repeatedly. |
| 2 | The showInputDialog() method makes an
input dialog and returns the String the user enters. |
| 3 | The toUpperCase() method converts the String to uppercase, allowing us to read input in either case. |
| 4 | We then call the isValid() method to make sure that the user entered a
valid DNA sequence. |
| 5 | If it is valid, we use displayCodons() to display
the codons in the sequence. |
| 6 | Either way, we use a showConfirmDialog() method to creating a confirm dialog, asking the user if he or she wants to continue entering sequences. The loop will continue as long as the return value is JOptionPane.YES_OPTION. |
    public static boolean isValid(String dna) {
        String validBases = "ACGT";
        for(int i = 0; i < dna.length(); i++) {
            char base = dna.charAt(i);
            if(validBases.indexOf(base) == -1)
                return false; //base not in "ACGT"
        }
        return true;
    }
The isValid() method checks to see if the DNA contains only the
letters representing the four bases. To do this, we use the Java
String library cleverly: We loop through the characters in our input,
checking to see where they can be found in "ACGT". If the index
returned is -1, the character was not found, and the DNA is invalid.
In the displayCodons() method, we display the individual codons to the
user.
    public static void displayCodons(String dna) {
        String message = "";
        // Get as many complete codons as possible
        for(int i = 0; i < dna.length() - 2; i += 3) (1)
            message += "\n" + dna.substring(i, i + 3);
        // 1-2 bases might be left over
        int remaining = dna.length() % 3;
        if(remaining == 1)
            message += "\n"+ dna.substring(dna.length() - 1, dna.length()) + "**";
        else if(remaining == 2)
            message += "\n"+ dna.substring(dna.length() - 2, dna.length()) + "*";
        message = "DNA length: " + dna.length() + "\n\nCodons: " + message;
        JOptionPane.showMessageDialog(null, message, (2)
            "Codons in DNA", JOptionPane.INFORMATION_MESSAGE);
    }
}| 1 | We build a large String with newlines separating each codon. To do so, we loop through the input, jumping ahead three characters each time. If the input length is not a multiple of three, we pad with asterisks. |
| 2 | We use the showMessageDialog() method to display an information dialog with the list of codons. |
7.5. Concurrency: Simple GUIs
Many GUI frameworks (including Swing) are built on a multi-threaded model. Swing uses threads to redraw widgets and listen for user input while the main thread can continue processing other data.
In this chapter, the impact of these threads is minimal because we used
only modal dialogs. Every time we called a JOptionPane method, the
execution of the program’s main thread had to wait until the method
returned. As it turns out, several threads are created when
showInputDialog() or any of the others dialog methods are called, but
they do not interact with the main thread since it’s been blocked.
The situation is more complicated with a non-modal dialog, which is one of the reasons we did not go into them. In a non-modal dialog, the threads that redraw the dialog and handle its events (like a user clicking on a button) are running at the same time as the thread that created the dialog. Since many threads are running, it’s possible for them to write to the same data at the same time. Doing so can lead to inconsistencies such as the ones we’ll describe in Chapter 14.
The GUIs we’ll create in Chapter 15, however, will be more than dialogs. They will be fully functional windows, known as frames in Java. Like a non-modal dialog, the creation of a frame doesn’t block the thread that created it.
Many applications launch a frame and then end their main thread. If no other threads are created, such a program is comparatively easy to think about. However, complex applications may create multiple frames or launch threads to work on tasks in the background. Another common problem is caused by performing complicated tasks in the event handler for a GUI. If a task takes too long, the GUI can freeze or become unresponsive, as you’ve probably experienced. The fact that this problem happens so frequently even in the latest operating systems should hint at the difficulty of managing GUI threads.
When we describe how to create fully featured GUIs in Chapter 15, we’ll also give some techniques to help with avoiding unresponsive GUIs in a multi-threaded environment.
7.6. Summary
In this chapter we’ve introduced a way to create simple GUIs. These
GUIs are created using various methods available in the JOptionPane
class. While the interfaces created this way are limited in scope,
they’re often adequate for input and output in short Java programs.
Construction of more complex GUIs is the subject of
Chapter 15.
7.7. Exercises
Conceptual Problems
-
In which situations would it be better to use a command-line interface instead of a GUI? When is it better to use a GUI over a command-line interface?
-
Explain the difference between a modal and a non-modal dialog. Give an example of when you would prefer a modal over a non-modal dialog and another example of when you would prefer a non-modal to a modal dialog.
-
Give one example each when you would use the five different message type constants in
showMessageDialog()method. -
In Program 7.2, we could have coded the line checking to see if the user had correctly determined whether the number was odd or even as follows.
if((response == 0 && x % 2 != 0) ||
   (response == 1 && x % 2 == 0))
Yet another option is below.
if(response != x % 2)Which of these three implementations is best? Why?
Programming Practice
-
Modify the program in Example 7.3 such that it tests the user many times whether a randomly generated integer is odd or even. The program should keep a score indicating the number of correct answers. At the end of the test, display the score using a suitable dialog.
-
Modify the program in Example 7.3 such that it displays a dialog that asks the user “Do you wish to continue?” and offers options “Yes” and “No.” The program should exit the loop when the “No” option is selected and display the score using a suitable dialog.
-
Rewrite Program 7.2 so that the dialog generated offers the “Yes,” “No,” and “Cancel” options to the user. The program should exit with a message dialog saying “Thank You” when the user selects the “Cancel” option.
-
Modify Program 7.3 to create and administer a test wherein the user is asked capitals of 10 countries in a sequence. The program must keep a count of the number of correct answers. Inform the user of the score at the end of the test using a suitable dialog.
-
Modify Program 7.3 so that the button labeled “Baku” has focus when the program begins.
-
Section 8.5 gives a method called
shuffle()that can randomize an array representing a deck of cards. Adapt this code and modify Program 7.3 so that the order of the capitals is randomized. Note that you will need to record which index contains the correct answer. -
Re-implement the solution to the college cost calculator problem given in Section 3.5 so that it uses GUIs constructed with
JOptionPanefor input and output. -
Re-implement the solution to the Monty Hall problem given in Section 4.4 so that it uses GUIs constructed with
JOptionPanefor input and output. -
Re-implement the solution to the DNA searching problem given in Section 5.4 so that it uses GUIs constructed with
JOptionPanefor input and output. -
Write a program that creates an input dialog that prompts and reads a file name of an image from the user. Then, create an information dialog that displays the file as a custom icon. In this way, you can construct a simple image viewer.
-
Use a
try-catchblock and modify Program 7.5 so that it handles an exception generated when the user enters text that cannot be converted to an integer. In the event such an exception is raised, pop up a message dialog box informing the user to try again and type an integer value. When the user responds by clicking the “OK” button on this message box, the input dialog box should appear once again and offer the user another chance at the answer. Write two versions of the modified program. In one version, your program should give only one chance for input after an incorrect string has been typed. In another version, your program should remain in a loop until the user enters a valid integer. There is, of course, no guarantee that an answer is correct just because it’s a valid integer.Note: You should attempt this exercise only if you’re familiar with exceptions in Java. Exceptions are covered in Chapter 12.