15. Constructing Graphical User Interfaces
A good sketch is better than a long speech.
15.1. Problem: Math tutor
Most people are used to using interacting with programs through a GUI rather than a command-line interface. In this chapter, our problem is to write a GUI program that can allow young math students to practice their arithmetic. Specifically, we’re interested in addition, subtraction, multiplication, and division with small, positive integers. For this program, we’ll consider addition and subtraction basic and multiplication and division advanced. Our program should allow the user to select a check box in a menu setting the mode to advanced or basic.
The user should then be able to select one of the four operations from another menu. Once the operation is selected, the program should generate a random problem testing that operation. The problem should be displayed as a label on the program with a text field to one side. The user should be able to enter an answer in the text field and hit a button to submit it. The program should check the answer and display the updated number of correct and incorrect answers.

MathTutor. (a) No menu selected. (b) Type selected. (c) Operations selected. (d) Attempting to answer an addition problem.Figure 15.1 shows the final program in four different states. The window on the top left appears when the program is first initialized, with the “Submit” button disabled until a problem is generated. The top right and the bottom left show each of the two menus open. The bottom right shows the program when an addition problem has been generated and the user is about to answer.
15.2. Concepts: Graphical user interfaces
The program shown above with its menus, labels, buttons, and other interactive components is called a graphical user interface or GUI. A GUI is a means of communication between a computer program and a (usually human) user. Although it’s possible for some programs such as scripts to interact with a GUI, most program-to-program communication is done in other ways.
While communication through input and output on the command line is one way to communicate with a program, GUIs offer a user-friendly alternative that has become extremely commonplace. In fact, GUIs are so common that many people have never used anything else to interact with programs and may not even suspect that other kinds of interaction are possible.
This chapter will teach you how to write programs with GUIs. Although GUIs can make input and output easier for the user, the programmer has to shoulder the burden of arranging the layout and appearance of the GUI and making it function properly. Chapter 7 introduced a way to make simple GUIs, but those GUIs came in preset flavors designed for displaying a message, getting a range of responses in the form of buttons or lists, or reading a short piece of text as input. In this chapter we’ll explore ways to make GUIs of arbitrary complexity with no limitations on the size or shape of the GUI or the components it contains.
A typical GUI consists of a frame (also known as a window) on which are displayed one or more components (known as widgets), such as panels, buttons, and text boxes. Panels are used to organize the contents within the frame. A frame contains at least one panel, but additional ones can be added. Each panel can also contain components: buttons, labels, text boxes, and even other panels. Using code to create a GUI with all the components laid out exactly where you want them is half the work of making a GUI-driven program in Java.
Some components like labels are read-only to the user. They display information such as status messages. Other components allow the user to give input to the program. Reading GUI input is usually done in response to an event. Handling events inside of a program is the other half of writing a GUI program in Java. Layout is concerned with appearance, but event handling is concerned with functionality.
Some IDEs such as IntelliJ have graphical tools that automatically generate GUI layout code for you. It’s fast to create a GUI with such tools, but the GUIs they create are often inflexible and look terrible when the window is resized. We focus on how to write all the code yourself because doing so gives you more control and helps you understand Java GUIs better.
15.2.1. Swing and AWT
Most of the components you’ll use to create GUIs are defined in
classes that belong to the Java Swing library. This library contains
many interfaces and classes. In earlier chapters, you have seen and
used one class from the Swing library, the JOptionPane class.
Some components of the Swing library are
built on another library known as the Abstract Window Toolkit or AWT.
The AWT is an older library which provides direct access to OS
components. Thus, an AWT Button object in Microsoft Windows creates a
Windows button. Swing, however, draws its own button. AWT GUIs look
exactly like other GUIs from the same OS. Swing GUIs can be configured
to look similar using look and feel settings, or developers can choose
to use a default Java look and feel that will look similar across all platforms.
We’ll discuss many Swing components such as JButton and JTextField. Swing
components usually have a J at the beginning of their names to
distinguish them from similar AWT components. (The AWT contains Button
and TextField. If you see examples from other sources using components
that don’t start with J, they’re probably using AWT.) Although Swing
is built on top of the older AWT library, it’s not a good idea to mix
Swing and AWT components in a single GUI.
The Swing library is far too large for us to cover in its entirety. Instead, our goal is to show you how to construct GUIs using some of the most common Java components. Once you’ve grasped the material in this chapter, you’ll be able to read and understand how to use many other interesting Swing components, as well as other Java libraries for constructing GUIs. The JavaFX library is a newer library that was intended to replace Swing, but it hasn’t been widely adopted. Although it’s still available, JavaFX is no longer included with Java 11 and higher and must be downloaded as a separate library.
15.3. Syntax: GUIs in Java
15.3.1. Creating a frame
A frame is the Java terminology for a window. GUI components in Java will
usually be found on a frame. In Swing, a frame is an object whose type is
derived from the JFrame class. Here’s a line of code that creates a JFrame object.
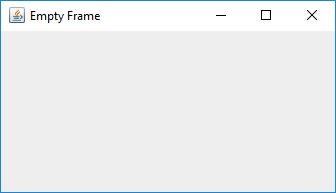
JFrame frame = new JFrame("Empty Frame");The above statement declares and creates a JFrame object named
frame. The title of the frame is “Empty Frame” and is given as
an argument to the JFrame constructor. Although calling the
constructor creates the frame, you need to make it visible for it to
show up on the screen.
frame.setVisible(true);The setVisible() method causes the frame frame to be visible on
the screen as a window. You can specify its size as follows.
frame.setSize(350,200);The setSize() method sets the width and height of the frame in pixels.
In the above example, the width of frame is set to 350
pixels and its height to 200 pixels. If you don’t set the size (or use a
method like pack() to make a JFrame resize itself to the appropriate
size for its contents), it might be so tiny that you at first don’t see it.
The window created by the above code is resizable. If you don’t want the user to be able to resize the window, you can specify that as well.
frame.setResizable(false);Your entire GUI will often be a frame you create and the components inside that frame. You might want your application to end when you close the frame by clicking on the close button toward the top. The actual location of this button depends on the operating system and the look and feel managers you’re using. Regardless, the following statement can be used to set the behavior of the application when you close the frame window.
frame.setDefaultCloseOperation(JFrame.DISPOSE_ON_CLOSE);|
Pitfall: Closing frames
Some books and online tutorials suggest setting Using By using It’s still necessary to select some default closing operation. By
default, the operation is set to |
Program 15.1 creates and displays an empty frame with the title “Empty Frame,” much like the code above.
import javax.swing.*; (1)

public class EmptyFrame {
    public static void main(String[] args){
        JFrame frame = new JFrame("Empty Frame"); (2)
        frame.setSize(350,200); (3)
        frame.setDefaultCloseOperation(JFrame.DISPOSE_ON_CLOSE); (4)
        frame.setVisible(true); (5)
    }
}| 1 | This import statement lets the compiler know we’re using the Swing library. |
| 2 | The first statement inside the main() method declares and creates a JFrame object
and assigns a title to it. |
| 3 | Then, we set its size. |
| 4 | Next, we set the default close operation. |
| 5 | Finally, we make the frame visible. |
The frame so created is shown in Figure 15.2.
You may resize the frame at any point in the program even after the frame has been created and made visible. The initial size may or may not be set prior to making the frame visible. Similarly, the frame title can be set and reset at any point in the program.
A single frame might need to open other subsidiary windows from time to time
to ask a question or display some information. To create windows dependent
on a parent frame, use JDialog instead of JFrame. A dialog window made
with JDialog can either be modal (meaning that the user must close it before they
can interact with the parent frame) or non-modal (allowing the user
to interact with it and its parent frame at the same time).
15.3.2. Components
A component (or widget) is an element of a GUI. Java provides a large variety of components including panels, buttons, text boxes, check boxes, radio buttons, and menus. When laying out a GUI, one or more of the components are created and then placed on a frame. A component is declared and created like any other object.
Widget w = new Widget(arguments);Here we use class Widget to represent any Swing component class like
JButton or JTextField. Arguments supplied while constructing a
component allow you to set attributes such as its icon, color, size, or
text to display. Most of these attributes can be changed after creation.
Although components can be added directly to a frame, it’s often convenient to lay out a GUI by adding panels to a frame and adding components to those panels. Each panel can hold zero or more components. A panel is also referred to as a container object. Next, we show you how to create a panel, populate it with components, add it to a frame, and display the completed frame.
In Swing, a panel is an instance of the JPanel class and can be created as
follows.
JPanel panel = new JPanel();This statement creates a panel named panel. Thus far, the panel
is empty. We can create two buttons and add them to panel.
JButton thisButton = new JButton("This");
JButton thatButton = new JButton("That");
panel.add(thisButton);
panel.add(thatButton);
Here, we create two buttons named thisButton and thatButton.
It’s common for component variables to reflect what kind of component
they are by appending a description, in this case Button, to their names.
These buttons are labeled "This" and
"That", but their labels could be any String values. Then, we add
the two buttons to the panel.
frame.add(panel);This statement adds the panel to an existing frame called frame.
Another useful component is JTextField. It creates a text field that can
be used by a program for both input and output of String data.
JTextField field = new JTextField("This is not a pipe.");This statement creates a JTextField component named field.
When displayed, it’ll show the text “This is not a pipe.”
The user can change this text by typing, but we won’t know when the text
has been change without the event handling tools discussed in
Section 15.3.3. The following example combines several
of the components we’ve introduced into one program.
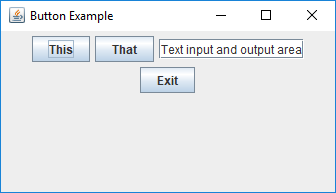
We can write an application with a GUI that contains three buttons labeled “This,” “That,” and “Exit.” In addition, it contains a text field that initially displays the text, “Text input and output area”
In this example the buttons are only for display. You can click each one, but the program won’t do anything. The text field won’t be changed by the program after it’s initialized either. In the next subsection we’ll add actions to each button and make the program more useful.
import javax.swing.*;

public class FrameWithPanel {
    public static void main(String[] args){
        JFrame frame = new JFrame("Button Example"); (1)
        JPanel panel = new JPanel(); (2)

        JButton thisButton = new JButton("This"); (3)
        JButton thatButton = new JButton("That");
        JButton exitButton = new JButton("Exit");
        JTextField field = new JTextField("Text input and output area");

		panel.add(thisButton); (4)
        panel.add(thatButton);
        panel.add(field);
        panel.add(exitButton);
        frame.add(panel); (5)
        frame.setSize(350,200);
        frame.setDefaultCloseOperation(JFrame.DISPOSE_ON_CLOSE);
        frame.setVisible(true); (6)
    }
}| 1 | We first create a frame named frame. |
| 2 | Then, we make a panel named panel. |
| 3 | Next, we create three buttons named thisButton, thatButton, and exitButton and a text field named field. |
| 4 | We add the buttons and the text field to panel. |
| 5 | We add panel to frame. |
| 6 | After setting the size and the closing operation, the frame is made visible. |
The final GUI is shown in Figure 15.3. The sequence in which you add the buttons to the panel determines the appearance of the GUI. That’s why the text field appears before the “Exit” button. Note that the same GUI may look different on different platforms.
In addition to JTextField, JTextArea and JPasswordField are two other
components useful for entering text. The JTextArea component is designed
for larger passages of text and allows multiple lines. The JPasswordField
component functions the same as a JTextField except that each character
of input text is displayed as a meaningless echo character designed to hide
sensitive information like a password.
Figure 15.4(a) shows a GUI with a JTextArea, and
Figure 15.4(b) shows a GUI with a JPasswordField.

15.3.3. Adding actions to components
We can design a GUI so that when a user clicks a button, the program responds by printing a message to the terminal, changing a text field, playing a sound, or any other action that a Java program can perform. Clicking a button generates an event. In Swing, an event is processed by one or more listeners. Java provides various types of listeners, some of which are introduced here. Next, we show you how to write listeners to handle events generated by a few different kinds of components.
The ActionListener interface
Java provides an ActionListener interface. This interface has a single
method named actionPerformed(). This method takes an ActionEvent as
input and performs a suitable action based on the event. A JButton
object generates ActionEvent when it’s pressed. Any class that
implements the ActionListener interface can be registered as an action
listener on a JButton or any other component that generates an
ActionEvent.
As discussed in Chapter 10, an interface is a set of
method signatures. If a class implements an interface, it promises that its objects will
have all of the methods in that interface. If a class implements
ActionListener, it’s saying that it knows what to do when an action is
performed. The following statements show how to add an ActionListener
to a button and implement its actionPerformed() method.
JButton thisButton = new JButton("This");
thisButton.addActionListener(new ActionListener() {
	public void actionPerformed(ActionEvent e) {
		// Code to perform an action goes here
	}
});
The first line above creates a button named thisButton. The remaining code
adds an action listener to the button. The process of adding an action
listener to an object is also known as registering a listener on the
object. Note that the sole argument to this addActionListener() method
is a newly created ActionListener object. Inside this newly created
and anonymous ActionListener object, we implement the
actionPerformed() method. Whatever code we want to execute in response
to the clicking of the thisButton button goes inside the
actionPerformed() method.
This syntax may look strange to you. ActionListener is an interface,
which can’t be instantiated. What’s that new keyword doing? It’s
doing something pretty amazing by creating an instance of an anonymous
class. On the fly, we’re creating a class that has never existed
before. It doesn’t even have a name! All we know about it is that it
implements the interface ActionListener.
Note that there are braces after the constructor call, defining what’s
inside of this class. Inside, we have only created an
actionPerformed() method, but we could have created fields as well as
other methods. It’s a little ugly to create a whole new class and
instantiate it in the middle of calling the addActionListener()
method, but it’s also very convenient. We need to supply an object that
reacts to the event exactly the way we want it to. Since one doesn’t
exist yet, we have to create it. Of course, it’s possible to supply any
object that implements the ActionListener interface, not just
instances of anonymous classes. For more information about nested
classes, inner classes, and anonymous classes, refer to
Section 9.4 and Section 10.4.
Now we can modify Program 15.2 to respond to button
clicks. When the thisButton button is clicked, the program will display the
message “You can get with this.” in the text field. Similarly, when the
thatButton button is clicked, the program will display “Or you can get with that.”
import javax.swing.*;
import java.awt.event.*;

public class FrameWithPanelAndActions {
    public static void main(String[] args){
        JFrame frame = new JFrame("Button Example");
        JPanel panel = new JPanel();

        JButton thisButton = new JButton("This");
        JButton thatButton = new JButton("That");
        JButton exitButton = new JButton("Exit");
        JTextField field = new JTextField("Text input and output area");

        panel.add(thisButton);
        panel.add(thatButton);
        panel.add(field);
        panel.add(exitButton);

        // Add action listeners to various buttons
        thisButton.addActionListener(new ActionListener() {
            public void actionPerformed(ActionEvent e){
                field.setText("You can get with this.");
            }
        });
        thatButton.addActionListener(new ActionListener(){
            public void actionPerformed(ActionEvent e){
                field.setText("Or you can get with that.");
            }
        });
        exitButton.addActionListener(new ActionListener(){
            public void actionPerformed(ActionEvent e){
                System.out.println("Exit");
                frame.dispose();
            }
        });
        frame.add(panel);
        frame.setSize(350,200);
        frame.setDefaultCloseOperation(JFrame.DISPOSE_ON_CLOSE);
        frame.setVisible(true);
    }
}
Program 15.3 is largely the same as
Program 15.2. It adds the same buttons and text
field but then adds an action listener to each button. The action
performed when the thisButton and thatButton buttons are clicked is to display
a message in the text box. When the exitButton button is clicked, the
listener displays a message on the terminal and exits the program.
The action listeners can be added either before or after the panel has been set up but should be added before the frame is made visible.
In the previous example, we added an ActionListener object to each
button and implemented its actionPerformed() method with anonymous
inner classes. An alternate way to use ActionListener is to implement
ActionListener on the surrounding class and include an
actionPerformed() method exactly once instead of creating several
individual anonymous inner classes which each handle an event. Let’s
examine one such implementation in
Program 15.4 and contrast it with
Program 15.3. Note that both programs
generate the same GUI and exhibit identical behavior.
ActionListener at the class level.import javax.swing.*;
import java.awt.event.*;
public class AlternateActionListener implements ActionListener {
private JFrame frame = new JFrame("Button Example");
private JPanel panel = new JPanel();
private JButton thisButton = new JButton("This");
private JButton thatButton = new JButton("That");
private JButton exitButton = new JButton("Exit");
private JTextField field = new JTextField("Text input and output area");
public AlternateActionListener (){ (1)
thisButton.addActionListener(this);
thatButton.addActionListener(this);
exitButton.addActionListener(this);
panel.add(thisButton);
panel.add(thatButton);
panel.add(field);
panel.add(exitButton);
frame.add(panel);
frame.setSize(350,200);
frame.setDefaultCloseOperation(JFrame.DISPOSE_ON_CLOSE);
frame.setVisible(true);
}
public void actionPerformed(ActionEvent e){ (2)
Object button = e.getSource(); (3)
if(button == thisButton) (4)
field.setText("You can get with this.");
else if(button == thatButton)
field.setText("Or you can get with that.");
else {
System.out.println("Exit");
frame.dispose();
}
}
public static void main(String[] args){ (5)
new AlternateActionListener();
}
}| 1 | The constructor adds an ActionListener to each button. The listener added is this, specifying that the AlternateActionListener object is the one that will process any action event generated by the buttons. The remainder of the code for the constructor is essentially the same as that from the main() method in Program 15.3. |
| 2 | A class that implements ActionListener must include an actionPerformed() method. It has exactly one parameter, an ActionEvent object. Whenever an action event occurs, its attributes are bundled into an ActionEvent object and passed into the actionPerformed() method. |
| 3 | The getSource() method returns a reference to the object that generated the event. Variable button holds the object returned by
getSource(). |
| 4 | These if statements compare button with thisButton and thatButton to determine if either of these generated the event. Then, a suitable message is displayed in the field text field. If neither button generated the event, it must have been exitButton, so the frame disposes itself after displaying “Exit” on the terminal. |
| 5 | The main() method creates an instance of AlternateActionListener and finishes. The program doesn’t end there because the threads of the GUI are already running. |
There are a few differences between
Program 15.3 and
Program 15.4. In
the second program, most of the code has been
moved from the main() method to the constructor. Various objects,
namely the frame, the panel, all three
buttons, and the text box are now fields of the object instead of local
variables in the main() method. The buttons need to be fields so that the
actionPerformed() method can compare against them, and the text box needs
to be a field so that the method can change it.
We’ve examined two styles of adding an ActionListener to a Java
program. The choice of style depends on your needs. Adding
an anonymous ActionListener to each component makes it easy to specify an
action for each one, but the syntax is ugly. Using a named class (often the main program class or a
subclass of JFrame) as the ActionListener allows you to handle many
events in a centralized location. It can be easier to find errors when
all events are handled in one actionPerformed() method, but the method
can become complex since it needs to determine which component generated the event.
The ItemListener interface
An ItemListener can be attached to a component such as a check box or a
radio button to listen for when it’s selected or deselected. When you select
a check box, a ✓ sign appears to its left, and an ItemEvent is
generated. When you select an already checked check box, the sign
disappears, and another ItemEvent is generated.
Creating a check box is very much like creating a button, except
that we use the JCheckBox component instead of JButton.
When it’s initially created, a check box is unchecked.
JCheckBox checkBox = new JCheckBox("Check the oven");Just as the ActionListener interface only has a single method, the
ItemListener interface only has one as well, itemStateChanged(), which
takes a single parameter of type ItemEvent.
An ActionEvent and an ItemEvent are similar, but one reason that Java
has two different interfaces with two different kinds of events is
because an ItemEvent has more information: By using the
getStateChange() method, it’s possible to tell whether the component
that fired the ItemEvent is now selected or deselected.
checkBox.addItemListener(new ItemListener(){
	public void itemStateChanged(ItemEvent e) {
		if(e.getStateChange() == ItemEvent.SELECTED)
			checkBox.setText("We checked the oven!");
		else
			checkBox.setText("No one checked the oven!");
	}
});
Below is an example of a GUI with three check boxes.
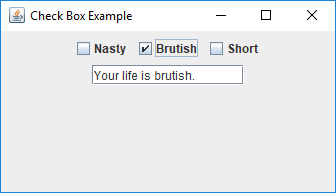
The following program shows a GUI with three check boxes labeled “Nasty”, “Brutish”, and “Short”. When each is clicked, it’ll update a text field saying that your life either is or isn’t nasty, brutish, or short, depending on whether or not the clicked check box is currently selected.
import javax.swing.*;
import java.awt.event.*;

public class CheckBoxExample {
    public static void main(String[] args){
        JFrame frame = new JFrame("Check Box Example"); (1)
        JPanel panel = new JPanel();

        JCheckBox nastyCheckBox = new JCheckBox("Nasty"); (2)
		JCheckBox brutishCheckBox = new JCheckBox("Brutish");
		JCheckBox shortCheckBox = new JCheckBox("Short");
        JTextField field = new JTextField("Here's what your life is like.");

        panel.add(nastyCheckBox); (3)
        panel.add(brutishCheckBox);
        panel.add(shortCheckBox);
		panel.add(field);

        // Add item listeners to the check boxes
        nastyCheckBox.addItemListener(new ItemListener() { (4)
            public void itemStateChanged(ItemEvent e) {
				if(e.getStateChange() == ItemEvent.SELECTED)
					field.setText("Your life is nasty.");
				else
					field.setText("Your life isn't nasty.");
            }
        });
        brutishCheckBox.addItemListener(new ItemListener(){
            public void itemStateChanged(ItemEvent e) {
                if(e.getStateChange() == ItemEvent.SELECTED)
					field.setText("Your life is brutish.");
				else
					field.setText("Your life isn't brutish.");
            }
        });
        shortCheckBox.addItemListener(new ItemListener(){
            public void itemStateChanged(ItemEvent e) {
                if(e.getStateChange() == ItemEvent.SELECTED)
					field.setText("Your life is short.");
				else
					field.setText("Your life isn't short.");
            }
        });
        frame.add(panel);  (5)
        frame.setSize(350,200);
        frame.setDefaultCloseOperation(JFrame.DISPOSE_ON_CLOSE);
        frame.setVisible(true);
    }
}| 1 | Just as in previous examples, we create a frame and a panel. |
| 2 | We make three check boxes and a text field. |
| 3 | Then we add all four components to the panel. |
| 4 | We create an ItemListener for each check box
to update the text field with an appropriate message
based on whether the check box is now checked or unchecked. Note that
the most recent message will overwrite whatever text was previously
in the text field. |
| 5 | Like previous examples, we add the panel to the frame, set the size, set the default close operation, and show the frame. |
Figure 15.5 shows this GUI after the “Brutish” check box has been clicked.
All JCheckBox objects could have an ActionListener added to them
as well. We could change the listener for the nastyCheckBox above to the following,
and it would function the same. To do so, we must ask the nastyCheckBox if it’s
currently selected by calling its isSelected() method.
		nastyCheckBox.addActionListener(new ActionListener() {
            public void actionPerformed(ActionEvent e) {
				if(nastyCheckBox.isSelected())
					field.setText("Your life is nasty.");
				else
					field.setText("Your life isn't nasty.");
            }
        });
Another Swing component that can be used with an ItemListener is JRadioButton.
Radio buttons are similar to check boxes in that clicking one will select it.
However, radio buttons are almost always used in a group. When one radio button
in the group is selected, all others are deselected, guaranteeing that only one
radio button can be selected at a time.
For example, the following code will create three radio buttons, only one of which can be selected.
JRadioButton smarterButton = new JRadioButton("Smarter than the average bear");
JRadioButton lessSmartButton = new JRadioButton("Less smart than the average bear");
JRadioButton asSmartButton = new JRadioButton("As smart as the average bear");

ButtonGroup group = new ButtonGroup();
group.add(smarterButton);
group.add(lessSmartButton);
group.add(asSmartButton);
The ButtonGroup object provides the logical grouping that guarantees a maximum
of one JRadioButton will be selected. This grouping is only for the purposes of
selection, and the radio buttons still need to be added to a panel or a frame or some other
GUI container to display them.
With check boxes, an ItemListener didn’t provide much of an advantage over an
ActionListener. A radio button, however, can be deselected not by clicking on it
but by clicking on another radio button. Thus, using an ItemListener allows us
to handle the event when a radio button is deselected, even though it wasn’t clicked
itself, as illustrated in the following example.
The program below shows a GUI with three radio buttons labeled “Half empty”, “Half full”, and “Twice the needed size”, describing a partially filled glass of water from the perspective of an optimist, a pessimist, or an engineer, respectively. When each radio button is selected, it’ll update the first text field describing the glass from the given perspective. However, when a radio button is deselected by clicking another one, it’ll update the second text field to describe what the glass isn’t, now that we’re in a different perspective.
import javax.swing.*;
import java.awt.event.*;

public class RadioButtonExample {
    public static void main(String[] args){
        JFrame frame = new JFrame("Radio Button Example");
        JPanel panel = new JPanel();

        JRadioButton halfEmptyButton = new JRadioButton("Half empty"); (1)
		JRadioButton halfFullButton = new JRadioButton("Half full");
		JRadioButton twiceTheSizeButton = new JRadioButton("Twice the needed size");
        JTextField positiveField = new JTextField("Positive statement about the glass.");
		JTextField negativeField = new JTextField("Negative statement about the glass.");

		ButtonGroup group = new ButtonGroup(); (2)
		group.add(halfEmptyButton);
		group.add(halfFullButton);
		group.add(twiceTheSizeButton);

        panel.add(halfEmptyButton); (3)
        panel.add(halfFullButton);
        panel.add(twiceTheSizeButton);
		panel.add(positiveField);
		panel.add(negativeField);

        // Add item listeners to the radio buttons
        halfEmptyButton.addItemListener(new ItemListener() { (4)
            public void itemStateChanged(ItemEvent e) {
				if(e.getStateChange() == ItemEvent.SELECTED)
					positiveField.setText("The glass is half empty.");
				else
					negativeField.setText("And it's not half empty.");
            }
        });
        halfFullButton.addItemListener(new ItemListener(){
            public void itemStateChanged(ItemEvent e) {
                if(e.getStateChange() == ItemEvent.SELECTED)
					positiveField.setText("The glass is half full.");
				else
					negativeField.setText("And it's not half full.");
            }
        });
        twiceTheSizeButton.addItemListener(new ItemListener(){
            public void itemStateChanged(ItemEvent e) {
                if(e.getStateChange() == ItemEvent.SELECTED)
					positiveField.setText("The glass is twice the needed size.");
				else
					negativeField.setText("And it's not twice the needed size.");
            }
        });
        frame.add(panel);  (5)
        frame.setSize(350,200);
        frame.setDefaultCloseOperation(JFrame.DISPOSE_ON_CLOSE);
        frame.setVisible(true);
    }
}| 1 | We make three radio buttons and two text fields. |
| 2 | We add the three radio buttons to a group. |
| 3 | Then we add the five components to the panel. |
| 4 | We create an ItemListener for each radio button. When the event
is a selection, it will update the first text field with a message
that matches the radio button. When the event is a deselection,
it will update the second text field with a message that suggests
the opposite of the radio button. |
| 5 | Like previous examples, we add the panel to the frame, set the size, set the default close operation, and show the frame. |
Figure 15.6(a) shows this GUI before any radio buttons have been selected. Figure 15.6(b) shows this GUI after the “Half full” radio button’s been selected. Figure 15.6(c) shows this GUI after the “Twice the needed size” radio button’s been selected. In this final step, note that the second text field reads “And it’s not half full.” because the “Half full” button was just deselected.

The MouseListener interface
Clicking a button or a check box is useful, but a mouse can generate events
in other ways too. For example, in a screen full of pictures, you might want to
highlight a picture when the cursor hovers over it. Or you might want to
create a drawing program which uses a mouse as a pen. To process general
mouse events, we need an object that implements the MouseListener
interface, which defines the following methods.
-
mouseClicked() -
mouseEntered() -
mouseExited() -
mousePressed() -
mouseReleased()
The function of each method is implied by its name. The mouseEntered()
event fires when the mouse cursor moves into the area above a component.
Conversely, the mouseExited() event fires when a mouse cursor was over
a component and has just moved away. The mousePressed() event fires
when a mouse button is pressed over a component. The mouseReleased()
event fires when a mouse button is released over a component.
The mouseClicked() event is a combination of
both the mousePressed() and mouseReleased() events, occurring only
if a mouse button was pressed and then released while the cursor was
over a component. As you can see, a component only fires events when the
cursor is over it (or has just left). Thus, a component only
reports events that have to do with it, not the general state of the
mouse.
Each method in MouseListener receives a MouseEvent object as its
argument. To handle mouse events, a class must implement the
MouseListener interface. Doing so is similar to the implementation of the
ActionListener interface from the previous section, but implementing
MouseListener requires a definition for each of the five methods
listed above. The next example illustrates MouseListener in use.
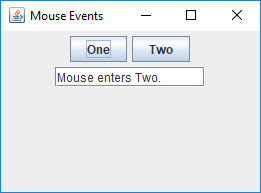
We can write a program that displays a GUI containing two buttons labeled “One” and “Two.” A text box will display a suitable message when the cursor enters a button. When a button is clicked, the text box should display the total number of times that button has been clicked.
MouseListener interface.import javax.swing.*;
import java.awt.*;
import java.awt.event.*;
public class SimpleMouseEvents implements MouseListener { (1)
private JFrame frame = new JFrame("Mouse Events");
private JTextField status = new JTextField("Mouse status comes here.");
private JButton oneButton = new JButton("One");
private JButton twoButton = new JButton("Two");
private int oneClicks = 0, twoClicks = 0; // Number of clicks
public SimpleMouseEvents() { (2)
JPanel panel = new JPanel();
oneButton.addMouseListener(this);
twoButton.addMouseListener(this);
panel.add(oneButton);
panel.add(twoButton);
panel.add(status);
frame.add(panel);
frame.setSize(275,200);
frame.setDefaultCloseOperation(JFrame.DISPOSE_ON_CLOSE);
frame.setVisible(true);
}
// Implement all abstract methods in MouseListener
public void mouseEntered(MouseEvent e) { (3)
if (e.getSource() == oneButton)
status.setText("Mouse enters One.");
else
status.setText("Mouse enters Two.");
}
public void mouseClicked(MouseEvent e) { (4)
if (e.getSource() == oneButton) {
oneClicks++;
status.setText("One clicked "+ oneClicks + " times.");
}
else {
twoClicks++;
status.setText("Two clicked "+ twoClicks + " times.");
}
}
public void mouseExited(MouseEvent e) {} // Unused methods (5)
public void mousePressed(MouseEvent e) {}
public void mouseReleased(MouseEvent e) {}
public static void main(String[] args){ (6)
new SimpleMouseEvents();
}
}| 1 | We declare class SimpleMouseEvents, implementing the MouseListener interface. The following few lines declare frame frame, buttons one and two, and a text box status. Two integers oneClicks and twoClicks are initialized to 0 and are used to keep track of the number of times each button has been clicked. |
| 2 | The first line of the SimpleMouseEvents constructor creates the panel
panel. It doesn’t need to be a field, and it’s always preferable to
keep a variable local if it can be. The next two lines add a MouseListener to the two buttons. Note the use of this in the argument to addMouseListener() which refers to the object being created by the constructor. Next, the panel is set up and added to the frame. Finally the frame size and its default close operations are set, and the frame is made visible. |
| 3 | The mouseEntered() method is invoked when the cursor enters either of the two buttons. First, we retrieve the source of the event using the getSource() method and identify which object generated the event. A suitable message is displayed in the status box using the setText() method. |
| 4 | The mouseClicked() method is invoked when the mouse cursor is clicked above a button. As before, we retrieve the source of the event using the getSource() method. A suitable message, including the number of clicks, is displayed in the text box. Of course, recording button clicks could have been done with an ActionListener instead. |
| 5 | MouseListener methods that aren’t used must be implemented, but their bodies can be left empty. |
| 6 | The only job of the main() method is to create an instance of
SimpleMouseEvents. |
Program 15.5 generates the GUI shown in Figure 15.7.
Mouse adapter
Creating a MouseListener requires all five methods in the interface to
be implemented. In many cases, as in Example 15.7,
there’s no need to implement all the methods because we’re not
interested in all the corresponding events. In such situations we’re
forced to include empty methods.
However, you might want to include the methods only when they’re
needed. The MouseAdapter class helps us avoid implementing
methods we don’t need.
MouseAdapter is an abstract class, unlike the MouseListener
interface. The advantage of using MouseAdapter is that it already
provides a skeletal implementation of each method needed to process
mouse events. We can override these implementations as needed, and we
don’t need to provide an implementation of a method that’s not used.
Program 15.6 is a revised version of Program 15.5. Remember that an abstract class is extended whereas an interface is implemented.
MouseAdapter abstract class.import javax.swing.*;
import java.awt.*;
import java.awt.event.*;
public class SimpleMouseAdapter extends MouseAdapter { (1)
private JFrame frame = new JFrame("Mouse Events");
private JTextField status = new JTextField("Mouse status comes here.");
private JButton oneButton = new JButton("One");
private JButton twoButton = new JButton("Two");
private int oneClicks = 0, twoClicks = 0;
public SimpleMouseAdapter () {
JPanel panel = new JPanel();
oneButton.addMouseListener(this);
twoButton.addMouseListener(this);
panel.add(oneButton);
panel.add(twoButton);
panel.add(status);
frame.add(panel);
frame.setSize(275,200);
frame.setDefaultCloseOperation(JFrame.DISPOSE_ON_CLOSE);
frame.setVisible(true);
}
// Override only those methods we want
public void mouseEntered(MouseEvent e) { (2)
if (e.getSource() == oneButton)
status.setText("Mouse enters One.");
else
status.setText("Mouse enters Two.");
}
public void mouseClicked(MouseEvent e) { (3)
if (e.getSource() == oneButton) {
oneClicks++;
status.setText("One clicked "+ oneClicks + " times.");
}
else {
twoClicks++;
status.setText("Two clicked "+ twoClicks + " times.");
}
}
public static void main(String[] args){
new SimpleMouseAdapter ();
}
}| 1 | Class SimpleMouseAdapter extends the abstract class MouseAdapter. Thus, it inherits all the empty methods defined in MouseAdapter. |
| 2 | We override the method mouseEntered(). |
| 3 | We override the method mouseClicked(). No other methods need to be overridden in this example. |
Other event listeners
In this chapter we describe three types of listeners in Java,
ActionListener, ItemListener and MouseListener. You may have noticed that none of
the mouse events we discussed involved the movement of the mouse inside
of the component, only whether it was entering or exiting the component.
Because tracking mouse movement is more computationally expensive than
tracking simple presses, releases, enters, and exits, Java uses yet another
listener to handle mouse movement, MouseMotionListener. It contains
the methods mouseDragged() and mouseMoved(), which are used to
handle mouse movement with or without the button pressed.
Java provides several other listeners to handle a variety of events. For
example, the DocumentListener can be attached to a JTextField or a
JTextArea object to listen to document events, which include the
insertUpdate() event that’s fired when a character is inserted the
text box. A KeyListener can also be attached to text boxes to listen
to key events such as the return key being typed, which can have similar
functionality. These events could be useful when developing a text editor
application, for example.
After you’ve mastered the contents of this chapter, you may plan to write more complex GUIs than the ones we discuss. For further information, you might want to follow the Java tutorial on writing event listeners at the Oracle Swing Events tutorial site.
15.3.4. Adding sounds and images
Sounds and images can also be added to a Java GUI application. While
Java offers a rich set of sound APIs, we restrict our examples to
playing sound clips from audio files that come in au or wav formats.
We also introduce the ImageIcon class to create icons from image
files.
Sounds
There are many ways to play sounds in Java, but the simplest is through the Clip interface. Let’s see how we can create an appropriate Clip
object.
Clip clip = AudioSystem.getClip();This statement creates a new Clip object using a static method from
the AudioSystem class in the javax.sound.sampled package. To use
clip, we need an audio file to play.
File soundFile = new File("sounds/trumpet.wav");       (1)
clip.open(AudioSystem.getAudioInputStream(soundFile)); (2)| 1 | Here we create a File object corresponding to the location of an audio
file we want to play. In this case, we’re trying to play a file called
trumpet.wav in a sounds directory that’s in the same directory as
our program. The location of the file could be much more complicated
or even entered by the user. |
| 2 | Then, we use the AudioSystem class to make an audio stream from the
file and open it with clip. Note that the two methods on this line can
throw a number of exceptions, depending on whether the file is in a usable
format and your computer’s audio system is ready. |
clip.start();This command will play the clip in clip loaded from the specified
file, exactly once. If you want to play the clip in a loop, use the
loop() method. You can specify a specific number of times to loop
or use the Clip.LOOP_CONTINUOUSLY constant to make it loop an unlimited
number of times.
clip.loop(Clip.LOOP_CONTINUOUSLY);To stop a clip from playing, use the stop() method.
clip.stop();Now that we’ve seen how to create, open, play, and stop an audio clip, we’re ready to write a program that can play sounds.
We can write a program to play a loop of a bird chirping or a dog barking when the corresponding button is clicked. Our program only has two sounds, but more could be added.

We can include a button labeled “Stop Sound” that stops the playback of sounds when clicked. When it starts, the GUI will look like Figure 15.8(a). Note that the “Stop Sound” button is gray, showing that it’s disabled. The complete program is shown below.
import java.io.*;  (1)
import java.awt.event.*;
import javax.swing.*;
import javax.sound.sampled.*;

public class AnimalSounds {
  public static void main (String[] args) throws Exception {
    JFrame frame = new JFrame("Animal Sounds");
    JPanel panel = new JPanel();
    JButton chirpButton = new JButton("Chirp");
    JButton barkButton = new JButton("Bark");
    JButton stopButton = new JButton("Stop Sound");
    JTextField field = new JTextField("Click Chirp or Bark.");
    File chirpFile = new File("sounds/chirp.wav"); (2)
    File barkFile = new File("sounds/bark.wav");
    Clip chirpClip = AudioSystem.getClip(); (3)
	chirpClip.open(AudioSystem.getAudioInputStream(chirpFile));
    Clip barkClip = AudioSystem.getClip();
	barkClip.open(AudioSystem.getAudioInputStream(barkFile));
    panel.add(chirpButton);
    panel.add(barkButton);
    panel.add(stopButton);
    panel.add(field);
    frame.add(panel);
stopButton.setEnabled(false); (4)| 1 | Many import statements are needed to cover all the library classes and interfaces used to play sounds. |
| 2 | After creating a number of GUI elements, we define the files for the two sounds. |
| 3 | Then, we create chirpClip and barkClip and open audio streams
corresponding to their sound files. |
| 4 | Note that we start with the stop button disabled. |
    chirpButton.addActionListener(new ActionListener() { (1)
        public void actionPerformed(ActionEvent e){
            field.setText("Playing chirp.");
            barkButton.setEnabled(false);
            chirpClip.loop(Clip.LOOP_CONTINUOUSLY);
            stopButton.setEnabled(true);
      }
    });
    barkButton.addActionListener(new ActionListener(){ (2)
        public void actionPerformed(ActionEvent e){
            field.setText("Playing bark.");
            chirpButton.setEnabled(false);
            barkClip.loop(Clip.LOOP_CONTINUOUSLY);
            stopButton.setEnabled(true);
      }
    });
    stopButton.addActionListener(new ActionListener(){ (3)
        public void actionPerformed(ActionEvent e){
            field.setText("Click Chirp or Bark.");
            chirpClip.stop();
            barkClip.stop();
			barkButton.setEnabled(true);
            chirpButton.setEnabled(true);
            stopButton.setEnabled(false);
      }
    });

    frame.setSize(275,200); // Set size in pixels
    frame.setDefaultCloseOperation(JFrame.DISPOSE_ON_CLOSE);
    frame.setVisible(true); // Display it
  }
}| 1 | Here we define the action listener for chirpButton, which
disables barkButton, tells the user that the chirp sound is playing, plays
the sound, and enables the stop button. |
| 2 | The action listener for barkButton button is similar. |
| 3 | The action listener for stopButton doesn’t know which sound is playing,
so it stops both sounds and then disables the stopButton. |
When chirpButton is clicked, the GUI looks like Figure 15.8(b).
Images and icons
Images are often useful when creating GUIs. In this section we show you
how to use images to create icons and then use those icons to decorate
buttons and labels. First, let’s see how an icon object can be created.
Suppose we have a picture file named smile.jpg in a directory named
pictures. Note that the pictures directory should be located in same
directory as the class files for your program. The following statement
creates an object of type ImageIcon from this picture.
ImageIcon smileIcon = new ImageIcon("pictures/smile.jpg");The file name, along with its path, is passed to the
ImageIcon constructor as a string. Now we can add the image to a
button.
JButton smile = new JButton();
smile.add(smileIcon);
Similarly, you can add an image to a label. The next example gives a simple program that creates a button with an image.
Figure 15.9 shows a GUI with a button decorated with a
picture. Program 15.8 gives the code to create this
GUI using the ImageIcon class.
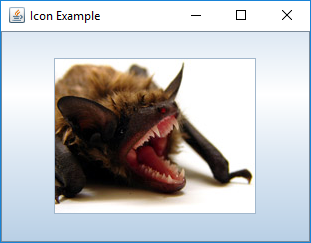
import javax.swing.*;
import java.awt.*;

public class IconExample {
    public static void main(String[] args) {
        JFrame frame = new JFrame("Icon Example");
        ImageIcon smileIcon = new ImageIcon("pictures/smile.jpg"); (1)
        JButton smileButton = new JButton(smileIcon); (2)
        frame.add(smileButton);
        frame.setSize(325,250);
        frame.setDefaultCloseOperation(JFrame.DISPOSE_ON_CLOSE);
        frame.setVisible(true);
  }
}| 1 | An image icon is created from a JPEG file named smile.jpg located in
the pictures directory. |
| 2 | We create a button named smileButton and decorate it with an icon
by supplying it as an argument to the JButton constructor. If
the file can’t be found, the program will fail quietly. This means that
no exception is thrown. Instead, the button will appear without an image. |
Labels, icons, and text
In some applications you might want to show a picture with an attached
text label. For example, a shopping cart application for an online clothing
store might shows pictures of clothes, each labeled with a name
and a price. The JLabel class is flexible, able to display text alone,
an image alone, or both. However, a JLabel is designed for displaying
information and can’t read user input.
Here are three different ways to create a label.
ImageIcon hibiscus = new ImageIcon("pictures/hibiscus.jpg")
JLabel textOnly = new JLabel("Text only");
JLabel flower = new JLabel(hibiscus);
JLabel labeledflower = new JLabel("Red Hibiscus", hibiscus, JLabel.CENTER);
The first JLabel constructor above creates a label displaying only
text, namely, “Text only.” The second constructor creates a label
decorated with an icon created from a picture. The third constructor
creates a label with the same icon and additional text. The last
argument in this third case is JLabel.CENTER, a constant that
specifies that the content of the label (both the image and the text)
should be placed horizontally in the center of the label. A horizontal
alignment of left or right could also be specified using the constants
JLabel.LEFT or JLabel.RIGHT, respectively.
Sometimes you might want to place the text below the icon that decorates the label. To do so, you could set the horizontal and vertical positions of the text as follows.
flower.setVerticalTextPosition(JLabel.BOTTOM);
flower.setHorizontalTextPosition(JLabel.CENTER);Figure 15.10(a) is generated by Program 15.9.

import javax.swing.*;
import java.awt.*;

public class LabelExample {
    public static void main(String[] args) {
        JFrame frame = new JFrame("Label Example");
        ImageIcon hibiscusIcon = new ImageIcon("pictures/hibiscus.jpg");
        JLabel flower = new JLabel("Red Hibiscus", hibiscusIcon, JLabel.CENTER);
        flower.setVerticalTextPosition(JLabel.BOTTOM); (1)
        flower.setHorizontalTextPosition(JLabel.CENTER); (2)
        frame.add(flower);
        frame.setSize(300,250);
        frame.setDefaultCloseOperation(JFrame.DISPOSE_ON_CLOSE);
        frame.setVisible(true);
  }
}| 1 | Vertically position the text on the bottom of the label. |
| 2 | Horizontally center the text on the label. |
You will see the GUI shown in Figure 15.10(b) if the alignment instructions on these two lines are omitted.
15.3.5. Layout managers
Java provides a number of layout managers to assist with the design of
GUIs. A layout manager controls the placement of
components on a frame or panel. Every container has a default layout
manager, but it’s possible to change that manager to a different one.
In this section we’ll introduce the three layout managers FlowLayout,
GridLayout, and BorderLayout. Java also provides several other layout
managers, each designed for different situations.
FlowLayout
The FlowLayout manager is one of simplest. When a
container is using the FlowLayout manager, components will be added in
order from left to right. When there’s no more space, subsequent
components will be added starting on the next row. In addition, each row of
components is centered within the container. The JPanel container uses
FlowLayout by default, but it’s possible to set it explicitly as
well.
JPanel panel = new JPanel(new FlowLayout());When we’ve added more than one component to a JFrame in previous
examples, we’ve first added them to a JPanel. The reason we did so is
because FlowLayout is the default layout manager for
JPanel containers. Although every JFrame has a container, it uses
the BorderLayout manager by default, which would have complicated our
earlier examples. The next example illustrates FlowLayout further.
FlowLayoutProgram 15.10 creates a GUI with several buttons.
FlowLayout.import javax.swing.*;
import java.awt.*;
public class FlowLayoutExample {
public static void main(String[] args) {
JFrame frame = new JFrame("FlowLayout Example"); (1)
JPanel panel = new JPanel(new FlowLayout()); (2)
final int MAX_BUTTONS = 6;
for(int i = 0; i < MAX_BUTTONS; i++) (3)
panel.add(new JButton(" " + i + " "));
frame.add(panel);
frame.setSize(300,200);
frame.setDefaultCloseOperation(JFrame.DISPOSE_ON_CLOSE);
frame.setResizable(false);
frame.setVisible(true);
}
}| 1 | We first create a frame. |
| 2 | We create a panel and set its layout manager to FlowLayout. |
| 3 | This for loop is used to create new buttons, label them appropriately, and add them to the panel. |
The FlowLayout manager places the buttons along a number of rows depending on the width of the frame.
If the container changes size, the components will react by "'flowing'" into different rows, hence the name.
The GUI created is shown in Figure 15.11.
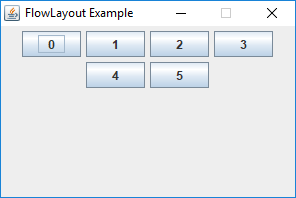
FlowLayout manager to generate a GUI containing six buttons.GridLayout
The GridLayout manager lays out components in a grid with a set number
of rows and columns. As with other layout managers, GridLayout can be
applied to frames and panels.
JFrame frame = new JFrame("Grid Layout Example");
frame.setLayout(new GridLayout(3, 2, 5, 5));
This snippet creates a frame named frame and sets its layout manager
to GridLayout. The first two arguments to GridLayout give the number
of rows and columns, respectively. The last two arguments (which are optional)
give the horizontal and vertical gaps between the neighboring cells in the
grid. In this example the frame will contain a total of six cells organized
into three rows with two columns.
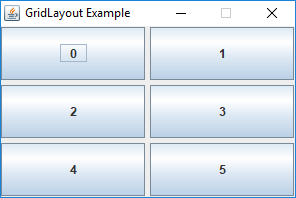
Figure 15.12 shows how frame will look after six
buttons, labeled 0 through 5, have been added to it in order. The buttons
were created in the same way as the buttons in Program 15.10, but
they look different because of the GridLayout manager. A key
feature of using GridLayout is that all cells in the grid will be
the same size and will stretch to fill the entire container. Also note
the equal spacing between the neighboring cells. It’s possible to add
more cells or fewer cells than specified in the GridLayout constructor, but
the layout manager will be forced to guess at your intentions.
We can write a program to display pictures of animals and identify which animal the mouse is current hovering over. The animal’s name will be displayed in the title of the frame. Figure 15.13 shows this GUI.
Program 15.11 creates the GUI shown in Figure 15.13.
GridLayout manager.import javax.swing.*;
import java.awt.*;
import java.awt.event.*;
public class AnimalIdentifier extends MouseAdapter { (1)
private JLabel bison, dove, gecko, spider; (2)
private JFrame frame = new JFrame("Animal Identifier");
public AnimalIdentifier() {
JPanel panel = new JPanel(new GridLayout(2,2,5,5)); (3)
ImageIcon bisonIcon = new ImageIcon("pictures/bison.jpg");
ImageIcon doveIcon = new ImageIcon("pictures/dove.jpg");
ImageIcon geckoIcon = new ImageIcon("pictures/gecko.jpg");
ImageIcon spiderIcon = new ImageIcon("pictures/spider.jpg");
bison = new JLabel(bisonIcon); (4)
bison.addMouseListener(this);
dove = new JLabel(doveIcon);
dove.addMouseListener(this);
gecko = new JLabel(geckoIcon);
gecko.addMouseListener(this);
spider = new JLabel(spiderIcon);
spider.addMouseListener(this);
panel.add(bison); (5)
panel.add(dove);
panel.add(gecko);
panel.add(spider);
frame.add(panel);
frame.setSize(400,400); (6)
frame.setDefaultCloseOperation(JFrame.DISPOSE_ON_CLOSE);
frame.setVisible(true);
}| 1 | Class AnimalIdentifier extends MouseAdapter so that it can
be added as a MouseListener without the need to implement all of its methods. |
| 2 | We declare four labels and a frame as fields. The labels are named bison, dove, gecko, and spider. |
| 3 | Inside the constructor, we create a panel with a 2 × 2 GridLayout. Then, we create four image icons, one to decorate each label. |
| 4 | Each of the four labels is created with its respective icon. We also add the AnimalIdentifier object we’re constructing as a MouseListener for each label. |
| 5 | The buttons are added to the panel, and the panel is added to the frame. |
| 6 | The last few lines set the size of the frame, set its close operation, and make it visible. |
	public void mouseEntered(MouseEvent e) { (1)
        Object label = e.getSource(); (2)
        if(label == bison)
          frame.setTitle("Animal Identifier: Bison");
        else if(label == dove)
          frame.setTitle("Animal Identifier: Dove");
        else if (label == gecko)
          frame.setTitle("Animal Identifier: Gecko");
        else if (label == spider)
          frame.setTitle("Animal Identifier: Spider");
    }

    public static void main(String[] args) { (3)
        new AnimalIdentifier();
    }
}| 1 | Since AnimalIdentifier extends MouseListener, we only need to implement the single MouseListener method we care about, mouseEntered(). |
| 2 | We get the label the mouse entered. We compare this label to the four labels and change the frame title correspondingly. |
| 3 | The main() method creates a new instance of
class AnimalIdentifier, launching the GUI. |
Play with Program 15.11. What happens when you resize the window?
BorderLayout
The BorderLayout manager is the default one for a JFrame. It allows
components to be laid out spatially in regions of a container. These
regions are north, south, east, west, and center. This layout is
intuitively easy to understand, but it’s difficult to describe
precisely.
You can only add one component to each region of the layout, and adding a component to any region is optional. The regions will stretch or shrink to accommodate the components inside. The north and south regions will only be as tall as needed to hold their contents, but their width will stretch as wide as the entire container. The east and west regions will only be as wide as needed to hold their contents, but their height will stretch as tall as needed to fit the remaining height of the container. Both the height and the width of the center region will stretch as big as it needs to fill the container.
BorderLayoutHere’s an example of a frame using BorderLayout. Five buttons have
been added, one to each region, using the program shown below. Since the default layout manager of a JFrame is a BorderLayout,
we don’t need to state it explicitly, although we do in this case.
BorderLayout.import javax.swing.*;
import java.awt.*;
public class BorderLayoutExample {
public static void main(String[] args) {
JFrame frame = new JFrame("BorderLayout Example");
frame.setLayout(new BorderLayout());
frame.add(new JButton("North"), BorderLayout.NORTH);
frame.add(new JButton("South"), BorderLayout.SOUTH);
frame.add(new JButton("East"), BorderLayout.EAST);
frame.add(new JButton("West"), BorderLayout.WEST);
frame.add(new JButton("Center"), BorderLayout.CENTER);
frame.setSize(400,250);
frame.setDefaultCloseOperation(JFrame.DISPOSE_ON_CLOSE);
frame.setVisible(true);
}
}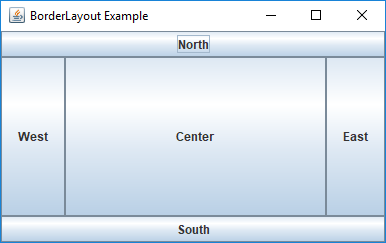
BorderLayout generated by Program 15.12.Unlike FlowLayout or GridLayout, the location must be specified to
add a component to a BorderLayout. To do so, the add() method
takes a second parameter, which is one of the constants BorderLayout.NORTH,
BorderLayout.SOUTH, BorderLayout.EAST, BorderLayout.WEST, or
BorderLayout.CENTER, depending on where you want to add the component.
If you don’t specify a second parameter, the component will be added to
the center region. Since only one component can be in each region,
adding a component to a region that’s already occupied will replace the
old component with the new one.
At first glance, BorderLayout seems that it would rarely be useful.
However, this layout is frequently used because it establishes a spatial
relationship between different parts of a GUI. A
container with a BorderLayout generally has other containers with
their own layouts added to its regions, as shown in the following
example.
We can make a GUI application that functions as a simple calculator. The calculator has the ten digits 0-9, a plus button, a minus button, and an enter button. At the top is a display that shows the current value.
We create ten JButton objects for the digits and three more JButton
objects for plus, minus, and enter. The display is a JLabel. The code
is given below.
import javax.swing.*;
import java.awt.*;

public class CalculatorLayout {
	public static void main(String[] args) {
		JFrame frame = new JFrame("Calculator Layout");
		frame.setLayout(new BorderLayout());
		JPanel numbers = new JPanel(new GridLayout(4,3));
		numbers.add(new JButton("7"));
		numbers.add(new JButton("8"));
		numbers.add(new JButton("9"));
		numbers.add(new JButton("4"));
		numbers.add(new JButton("5"));
		numbers.add(new JButton("6"));
		numbers.add(new JButton("1"));
		numbers.add(new JButton("2"));
		numbers.add(new JButton("3"));
		numbers.add(new JButton("0"));
		numbers.add(new JButton("+"));
		numbers.add(new JButton("-"));
		frame.add(numbers, BorderLayout.CENTER);
		JButton enter = new JButton("Enter");
		frame.add(enter, BorderLayout.SOUTH);
		JLabel display = new JLabel("0");
		frame.add(display, BorderLayout.NORTH);
		frame.setSize(300,350);
		frame.setDefaultCloseOperation(JFrame.DISPOSE_ON_CLOSE);
		frame.setVisible(true);
	}
}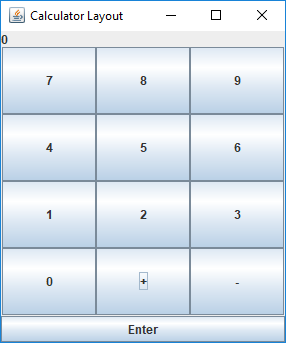
This program uses a frame with a BorderLayout to arrange components around
a central panel with a GridLayout. First, we
put the ten digit buttons in a panel with a GridLayout having 4 rows
and 3 columns. We put the plus button and the minus button in the
remaining two cells of the grid. We add this grid panel to the center region
of the frame. We put the enter button in the south region
and the display in the north region.
Note that this program only creates the layout of a simple calculator, not the functionality.
There’s no limit to how deeply you can nest containers within each
other. Sometimes you must use many BorderLayout managers to achieve the
appearance you want. The value of establishing these spatial relationships
is that they’re still valid even when the GUI is resized. Even so, it’s
challenging to make a usable GUI that looks attractive no matter how
the user resizes it or what the resolution of the user’s screen is.
Although there’s not enough space here to discuss strategies for
developing attractive GUIs, it’s worth noting the value of the
setPreferredSize() method that all components have. This method is
one of the best ways to suggest a size for particular components,
especially if other components and containers are going to stretch
as needed. When key components have their sizes set using
setPreferredSize(), the entire frame can be packed using the
pack() method, which sizes the frame to fit its components.
The three layout managers discussed in this section are the simplest,
but there are others. The BoxLayout manager is a useful tool for
laying out components in a line, whether horizontal like a row or
vertical like a column. The GridBagLayout
manager can be used to create complex layouts in a single container
using a grid-based framework that’s much more flexible than
GridLayout, but the complexity of programming GridBagLayout is
significant. The SpringLayout and GroupLayout managers are also
powerful, but they’re designed for use with a GUI builder utility.
15.3.6. Menus
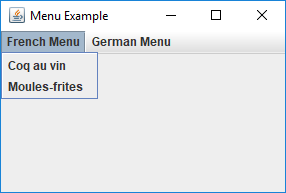
Menus provide a useful form of interface that’s expected from most GUI applications. In this section we show how to create menus and respond to the selection of menu items. Menus are placed on a menu bar. Each menu usually consists of several menu items that could be selected by the user. In addition to simple text, a menu item can be a button, a radio button, check box, or an icon. A menu can have one or more sub-menus opening out of a menu item.
Creating menus
To use menus we have to create a menu bar.
JMenuBar menuBar = new JMenuBar();This statement creates an object of type JMenuBar named menuBar which
can hold menus. A JFrame has only one menu bar. We can create several
menus and add them to the menu bar.
JMenu frenchMenu = new JMenu("French Menu");
JMenu germanMenu = new JMenu("German Menu");
menuBar.add(frenchMenu);
menuBar.add(germanMenu);
These statements create two menus named frenchMenu and germanMenu labeled
“French Menu” and “German Menu,” respectively. The two menus can be added to the existing menu bar using the add() method. Menus can be populated
with menu items as follows.
JMenuItem coqAuVin = new JMenuItem("Coq au vin");
JMenuItem moulesFrites = new JMenuItem("Moules-frites");
frenchMenu.add(coqAuVin);
frenchMenu.add(moulesFrites);
These statements create two menu items named coqAuVin and
moulesFrites. These menu items are then added to the menu frenchMenu.
After having created a menu bar together with its menus and their
respective menu items, we need a frame so that we can set its menu bar
to the one we created.
JFrame frame = new JFrame("Menu Example");
frame.setJMenuBar(menuBar);
These statements create a frame and set its menu bar to menuBar. It’s
possible to use the add() method instead of the setJMenuBar() method
to add a JMenuBar to a JFrame. However, doing so will add the
JMenuBar to the regular content area, not to the menu area.
Figure 15.16 shows a GUI with the menus and menu items added above.
Sometimes you might need to disable a menu item and enable it only under certain conditions.
JMenuItem unusable = new JMenuItem("Currently unusable");
unusable.setEnabled(false);
These statements create a menu item named unusable and disable it.
A disabled menu item shows as a gray item and doesn’t respond to
attempts to select it. As we showed in Example 15.9, JButton
objects, like many other components, can be disabled in the same way.
Adding events to menus
An action listener can be added to each menu item, just like a
JButton. Then, when a menu item is clicked by the user, an action
event is generated. A JCheckBoxMenuItem object can be added to a
JMenu as well. This object will have a check box which can be selected
or unselected. A regular JMenuItem object generates an ActionEvent
which is handled by an ActionListener. Like a JCheckBox, a
JCheckBoxMenuItem can also generate an ItemEvent handled by an
ItemListener. Here are examples of both situations.
JMenuItem clickHere = new JMenuItem("Click here");
JCheckBoxMenuItem checkBox = new JCheckBoxMenuItem("Check yourself");
clickHere.addActionListener(this);
checkBox.addItemListener(this);
A JMenuItem works just like a JButton. In fact, the same action
listener code could handle events for both buttons and menu items.
Similar to JCheckBox objects, a JCheckBoxMenuItem can be handled with an ActionListener if you only want to know when it’s clicked on. However, you can add an ItemListener if you want to write an event handler that runs whenever the state of its check box changes.
15.4. Solution: Math tutor
Here we give the code to generate the GUI shown in Figure 15.1 which displays basic (addition and subtraction) as well as advanced (multiplication and division) problems.
As shown in Figure 15.1, this GUI has a menu bar consisting of two menus labeled “Type” and “Operations.” The “Type” menu contains a check box labeled “Advanced” while the “Operations” menu contains four menu items labeled “Add,” “Subtract,” “Multiply,” and “Divide.” Note that the “Multiply” and “Divide” menu items start disabled. They’ll be enabled when the user selects the “Advanced” check box.
Before we introduce the program that creates this GUI, we need a helper
class called ProblemGenerator that can randomly generate arithmetic
problems. The class is designed so that the answers are always positive
integers.
import java.util.Random;
import javax.swing.*;

public class ProblemGenerator {
    private Random random = new Random();

    public int addPractice(JLabel label) {
        int a = random.nextInt(12) + 1;
        int b = random.nextInt(12) + 1;
        label.setText(a + " + " + b + " = ");
        return a + b;
    }

    public int subtractPractice(JLabel label) {
        int a = random.nextInt(12) + 1;
        int b = a + random.nextInt(12) + 1;
        label.setText(b + " - " + a + " = ");
        return b - a;
    }

    public int multiplyPractice(JLabel label) {
        int a = random.nextInt(12) + 1;
        int b = random.nextInt(12) + 1;
        label.setText(a + " \u00D7 " + b + " = ");
        return a * b;
    }

    public int dividePractice(JLabel label) {
        int a = random.nextInt(12) + 1;
        int b = a*(random.nextInt(12) + 1);
        label.setText(b + " \u00F7 " + a + " = ");
        return b / a;
    }
}
The code listed above has methods addPractice(),
subtractPractice(), multiplyPractice(), and dividePractice(). Each
method generates an appropriate math problem, sets an input JLabel to
display the problem, and returns the solution. Note that \u00D7 and
\u00F7 are the Unicode values for the multiplication (×) and division (÷)
symbols.
Program 15.15 generates the GUI in Figure 15.1.
import javax.swing.*;
import java.awt.*;
import java.awt.event.*;

public class MathTutor implements ActionListener, ItemListener {
    private JMenuItem add = new JMenuItem("Addition"); (1)
    private JMenuItem subtract = new JMenuItem("Subtraction");
    private JMenuItem multiply = new JMenuItem("Multiply");
    private JMenuItem divide = new JMenuItem ("Divide");
    private JLabel score = new JLabel("Score: 0 Correct 0 Incorrect");
    private JLabel label = new JLabel();
    private JTextField field = new JTextField(10);
    private JButton submitButton = new JButton("Submit");
	private ProblemGenerator generator = new ProblemGenerator(); (2)
	private int correct = 0;	(3)
    private int incorrect = 0;
private int answer = -1;| 1 | We begin by creating the GUI components that need to interact with event handlers: four menu items, a label, a text field, and a button. |
| 2 | We also create a ProblemGenerator object to help create new problems. |
| 3 | Next, we add int fields to store the number of correct and incorrect answers as well as the answer to the current problem. |
    public MathTutor() { (1)
        JFrame frame = new JFrame("Math Tutor");
        JMenuBar menuBar = new JMenuBar();
        JMenu typeMenu = new JMenu("Type");
        JMenu operationsMenu = new JMenu("Operations");
        JCheckBoxMenuItem advanced = new JCheckBoxMenuItem("Advanced");
        // Add listeners to menu items (2)
        add.addActionListener(this);
        subtract.addActionListener(this);
        multiply.addActionListener(this);
        divide.addActionListener(this);
		advanced.addItemListener(this); (3)
		//Add anonymous ActionListener to submitButton (4)
		submitButton.addActionListener(new ActionListener() {
			public void actionPerformed(ActionEvent e) {
				int response = Integer.parseInt(field.getText());
				if(response == answer)
					correct++;
				else
					incorrect++;
				label.setText("");
				score.setText("Score: " + correct + " Correct " +
					incorrect + " Incorrect");
				submitButton.setEnabled(false);
			}
}); | 1 | Inside the MathTutor constructor, we create the frame and the remaining components. |
| 2 | Action listeners are added to the four operations menu items. |
| 3 | An item listener is added to the “Advanced” check box menu item because it requires a different kind of event handler. Note that MathTutor implements both the ActionListener and ItemListener interfaces, allowing it to handle both kinds of events. |
| 4 | Next, we add an anonymous ActionListener just for the submit button. It
reads the response from the text field, converts it into an integer, and checks against the answer. If the response is correct, it increments the counter for correct answers. Otherwise, it increments the counter for incorrect answers. Finally, it updates the score label and disables the submit
button until another operation is chosen from the menu. |
        typeMenu.add(advanced); (1)
        operationsMenu.add(add); (2)
        operationsMenu.add(subtract);
        operationsMenu.add(multiply);
        operationsMenu.add(divide);
        multiply.setEnabled(false); (3)
        divide.setEnabled(false);
        menuBar.add(typeMenu); (4)
        menuBar.add(operationsMenu);
        frame.setJMenuBar(menuBar);
        // Add components to frame and display GUI (5)
        frame.add(score, BorderLayout.NORTH);
        frame.add(label, BorderLayout.WEST);
        frame.add(field, BorderLayout.EAST);
        frame.add(submitButton, BorderLayout.SOUTH);
		submitButton.setEnabled(false);
        frame.setSize(300, 150);
        frame.setDefaultCloseOperation(JFrame.DISPOSE_ON_CLOSE);
        frame.setVisible(true);
}| 1 | We add the advanced menu item to the type menu. |
| 2 | Then, we add the four kinds of operations to the operations menu. |
| 3 | The multiply and divide menu items are disabled because the application starts in basic mode. |
| 4 | The menus are then added to the menu bar, and the menu bar is set on the frame. |
| 5 | Finally, the labels and text field are added to the frame, which is made visible. Note that these components can be added directly to the frame with the parameters BorderLayout.NORTH, BorderLayout.EAST, and BorderLayout.WEST because JFrame objects use the BorderLayout manager by default. |
    public void itemStateChanged(ItemEvent e) {
        if(e.getStateChange() == ItemEvent.SELECTED) {
            add.setEnabled(false);
            subtract.setEnabled(false);
            multiply.setEnabled(true);
            divide.setEnabled(true);
        }
        else {
            add.setEnabled(true);
            subtract.setEnabled(true);
            multiply.setEnabled(false);
            divide.setEnabled(false);
        }
    }
The itemStateChanged() method enables the multiply and divide menus and
disables the add and subtract menus if the advanced check box is
selected and does the reverse if it’s been unselected.
    public void actionPerformed(ActionEvent e){
        Object menuItem = e.getSource();
		if(menuItem == add)
			answer = generator.addPractice(label);
		else if(menuItem == subtract)
			answer = generator.subtractPractice(label);
		else if(menuItem == multiply)
			answer = generator.multiplyPractice(label);
		else if(menuItem == divide)
			answer = generator.dividePractice(label);
		submitButton.setEnabled(true);
		field.setText("");
    }
Depending on which menu item fired the event, the actionPerformed() method calls the
appropriate method from the ProblemGenerator object to create and then
display a math problem on label. The correct answer is stored in answer.
Note that this actionPerformed() method doesn’t handle the submit button
because it has its own anonymous class handler. We use both styles of listener
to keep the code simpler: Handling the submit button separately makes sense
because it’s different, but handling the operations menu items together makes
sense because they’re similar.
    public static void main(String[] args){
        new MathTutor();
    }
}
Last but not least, the main() method creates an instance of MathTutor, initiating GUI construction and display.
15.5. Concurrency: GUIs
Stand-alone Java programs have at least one thread, the main thread. Applications with GUIs create additional threads to manage the GUI behind the scenes.
Although a GUI will create several threads, the most relevant of these
is the event dispatch thread (EDT). This thread handles events like
button clicks. When you write actionPerformed() methods, remember
that the EDT is the one that will actually execute the code inside.
If you’re writing a complex program, the EDT may interact with many other threads, and the synchronization issues discussed in Chapter 14 will become important. However, only the EDT is allowed to change the state of components in a GUI. Using other threads to do so will work some of the time, but it’s not thread-safe and violates the design of Swing.
15.5.1. Worker threads
Thread safety is not the most common multi-threaded GUI problem, however. Unresponsive GUIs can be found on almost every platform, as you’ve no doubt experienced. In Java, unresponsive GUIs usually happen when the programmer uses the event dispatch thread to perform some task that takes too long. Because the EDT is responsible for updating the GUI, the GUI freezes, and the user has to wait.
This problem presents quite a conundrum. On the one hand, the EDT is the only thread allowed to update components. On the other, it has to do its work quickly so that the GUI is responsive. The solution is to spawn worker threads to do the job. When they’re done, they can tell the EDT to update the GUI.
Let’s look at a GUI with two JButton components and two JLabel components.
When one button’s pressed, the EDT goes to sleep for 5 seconds before
displaying an answer on the first label (in this case, approximately
the square root of 2). When the other button’s pressed, it increments
a counter and displays the value in the second label.
import javax.swing.*;
import java.awt.*;
import java.awt.event.*;

public class UnresponsiveGUI implements ActionListener {
    private JLabel answerLabel = new JLabel("Answer:");
    private JButton computeButton = new JButton("Compute");
    private JLabel countLabel = new JLabel("0");
    private JButton incrementButton = new JButton("Increment");
    private int count = 0;

    public UnresponsiveGUI() {
        JFrame frame = new JFrame("Unresponsive GUI");
		frame.setLayout(new GridLayout(4,1));
        computeButton.addActionListener(this);
		incrementButton.addActionListener(this);
		frame.add(answerLabel);
        frame.add(computeButton);
        frame.add(countLabel);
        frame.add(incrementButton);
		frame.setDefaultCloseOperation(JFrame.DISPOSE_ON_CLOSE);
        frame.setSize(300,150);
        frame.setVisible(true);
    }

    public void actionPerformed(ActionEvent e) {
        if(e.getSource() == computeButton) {
            answerLabel.setText("Computing...");
            try {
                Thread.sleep(5000);
            }
			catch(InterruptedException ignore) { }
            answerLabel.setText("Answer: " + Math.sqrt(2.0));
        }
        else {
            count++;
            countLabel.setText("" + count);
        }
    }

    public static void main(String args[]) {
        new UnresponsiveGUI();
    }
}
If you click the “Compute” button, the GUI becomes unresponsive. Specifically, nothing will happen when you click the “Increment” button, but you should still be able to move the frame around the desktop on most systems. Furthermore, some thread in the GUI is registering the clicks you do on the “Increment” button, though events triggered by those clicks aren’t handled until after the EDT wakes up. At that point, the counter will shoot up in value unpredictably.
One solution is to create an anonymous inner class that extends
SwingWorker. The SwingWorker class is abstract, but it’s also
generic, meaning that it has type parameters (given in angle brackets)
which specify what type of objects it interacts with. Generic classes
are often containers like LinkedList where the type parameter says
what kind of objects will be kept in the list.
Chapter 18 covers generics
in some depth. The reason we need generics for SwingWorker is so that it
can specify what kinds of answers it produces.
The first type parameter specifies the type that the worker will return when
it completes its work. The second specifies the type that the worker will return
periodically in the process of doing work (which can be useful for
updating progress bars). Examine the following program which has added a
SwingWorker to its actionPerformed() method but is otherwise the
same as Program 15.16.
SwingWorker to avoid becoming unresponsive.import javax.swing.*;
import java.awt.*;
import java.awt.event.*;
public class WorkerGUI implements ActionListener {
private JLabel answerLabel = new JLabel("Answer:");
private JButton computeButton = new JButton("Compute");
private JLabel countLabel = new JLabel("0");
private JButton incrementButton = new JButton("Increment");
private int count = 0;
public WorkerGUI() {
JFrame frame = new JFrame("Worker GUI");
frame.setLayout(new GridLayout(4,1));
computeButton.addActionListener(this);
incrementButton.addActionListener(this);
frame.add(answerLabel);
frame.add(computeButton);
frame.add(countLabel);
frame.add(incrementButton);
frame.setDefaultCloseOperation(JFrame.DISPOSE_ON_CLOSE);
frame.setSize(300,150);
frame.setVisible(true);
}
public void actionPerformed(ActionEvent e) {
if(e.getSource() == computeButton) {
SwingWorker worker = new SwingWorker<String, Void>() { (1)
public String doInBackground() { (2)
try {
Thread.sleep(5000);
}
catch(Exception ignore) {}
return "Answer: " + Math.sqrt(2.0); (3)
}
public void done() { (4)
try {
answerLabel.setText(get());
}
catch (Exception ignore) {}
}
};
worker.execute(); (5)
answerLabel.setText("Computing...");
}
else {
count++;
countLabel.setText("" + count);
}
}
public static void main(String args[]) {
new WorkerGUI();
}
}| 1 | In this program, the first type parameter for the SwingWorker is
String because we’re going to set the text in a JLabel with its
result. The second parameter is Void, meaning that we don’t intend to
return any values periodically. Most child classes of SwingWorker
should override the doInBackground() and done() methods. |
| 2 | The doInBackground() method performs the time-consuming work we
want done on another thread. In our example, the “work” is just going to
sleep, but it will generally be some CPU or I/O intensive process. |
| 3 | Afterward, it returns the answer it found. |
| 4 | The done() method is
called automatically by the EDT after doInBackground() finishes. Note that
the get() method automatically returns whatever answer was produced by
the doInBackground() method. |
| 5 | Once the SwingWorker object has been created, the execute() method starts
it running. |
This GUI will look identical to the unresponsive version (except for the title), but it will remain responsive.
This syntax is not particularly elegant, but it accomplishes a complex
task. It spawns a thread transparently and then notifies the EDT when the
thread has its answer ready. Using a SwingWorker isn’t
always required, but it’s a useful tool to have in your arsenal if you
plan on writing industrial-strength, responsive GUIs.
15.6. Summary
This chapter covers the fundamentals of constructing a GUI to allow users to interact with an application. We show how to add components such as buttons and text boxes and use layout managers to organize their appearance. We show how you can add action listeners and other event handlers so that user interactions like button clicks can trigger useful tasks.
While Java offers a large variety of components and listeners, this introduction is limited to a few of the most commonly used. Once you understand the basics of GUI construction as described in this chapter, it should be easy to understand the extensive Java tutorial at the Oracle Swing Components tutorial site or other reference sources.
15.7. Exercises
Conceptual Problems
-
Both
ActionListenerandMouseListenerinterfaces can be used to process button clicks. Under which circumstances isActionListenerbetter? Under which isMouseListenerbetter? -
What do you expect will happen if you used
setJMenuBar()to set two different menu bars on a singleJFrameobject? -
Describe the situations that the following event listeners are useful for:
ActionListener,MouseListener, andItemListener.
Programming Practice
-
Write a program that creates a GUI containing two buttons labeled “Start” and “Done.” The GUI frame should be titled “Start and Done.”
-
Modify Program 15.5 by implementing the
mouseExited(),mousePressed(), andmouseReleased()methods. Each method must display a suitable message in the text box when the corresponding event occurs. For example, when the mouse exits buttonone, the text box should display “Mouse exits One.” -
Modify Program 15.8 such that clicking the icon-decorated button plays the sound of a bat squeaking. You will need to add an
ActionListenerto the button, create an audio clip for the desired sound, and then play this clip when the button is clicked. Consider visiting Freesound.org to find free sound files. -
Write a Java program that creates a GUI containing a label with a picture of yourself.
-
Extend the
AnimalSoundsclass developed in Example 15.9 to include sounds for various animals. There are many publicly available sounds files for use in your program. The Freesound link above is only one source. -
In Example 15.9 we stopped both the chirp and the bark sounds because the action listener corresponding to the “Stop Playing” button didn’t know which sound was playing. Modify Program 15.7 so that only the sound that’s playing is stopped. You may need to declare another variable to keep track of which is playing.
-
Modify Program 15.11 so that it plays a sound associated with an animal when the mouse is clicked over its label. Note that this is an example of a situation where a
MouseListenercan be used to listen for mouse click events though anActionListenercannot. As in Exercise 15.7 and Exercise 15.9, you may need to download sounds from the Internet. -
Modify the GUI from Section 15.4 to display the problem number the user’s working on. The first problem will be numbered “Problem 1” with subsequent problems 2, 3, and so on. The number should increase each time the user hits the “Submit” button. Find a suitable place on the GUI to display this information. You may need to add a panel to reorganize the GUI.
-
Remove the
actionPerformed()anditemStateChanged()methods from theMathTutorclass given in Section 15.4. Move the code from these methods into individual anonymous inner classes added to theadd,subtract,multiply,divide, andadvancedobjects.Note that you can now remove
ActionListenerandItemListenerfrom the list of implemented interfaces for theMathTutorclass. Reorganizing the code this way should have no impact on the functionality of the program. Is doing so a good idea? Why or why not? -
In Program 15.3 exchange the first two
add()method calls on thepanelso thatthatButtonis added to the panel beforethisButton. Explain how the appearance of the GUI is changed. -
Modify Program 15.2 by adding a second panel named
secondPanel. Create a new button namedotherButtonwith the label “The Other.” AddotherButtontosecondPanel. Now addsecondPaneltoframeand look at the GUI generated. Can you explain why only components from one of the panels is visible? -
Remove the line
frame.setResizable(false);from Program 15.10. Run the modified program and resize the frame to various sizes. How does the placement of the buttons change? -
Modify Program 15.10 by deleting the lines that set the frame size. What does the resulting GUI look like? Now add the following code just before the line
frame.setResizable(false);:frame.pack();When you run the modified program, what’s the impact of using the
pack()method? -
Create a GUI with a frame that uses
GridLayoutand has a suitable size. Use a 3 × 2 layout with a horizontal and vertical spacing of 5 pixels each. Use a loop to add eight buttons to your frame, labeled 1 through 8. Observe how the frame expands to include all the buttons even though theGridLayoutonly specified 6 cells. Depending on the frame size, you might have to resize the window to see all cells and buttons. What happens if you add fewer than 6? -
Consider the calculator layout from Program 15.13. Add listeners to all of its buttons so that clicking on the number buttons, the plus and minus buttons, and the “Enter” button will make it perform like a calculator capable of addition and subtraction. Note that you’ll need to add some additional fields to keep track of the current value and whether or not the user has just pressed the plus or minus buttons.
-
Write a Java program that creates a GUI with a frame and a menu bar containing a single menu. Add a menu item to this menu. Use the
add()method, not thesetJMenuBar()method, to add the menu bar to the frame. What’s the difference between using theadd()method and thesetJMenuBar()method to add a menu bar to aJFrame?
Experiments
-
Recall that Program 15.16 is unresponsive because the event dispatch thread goes to sleep for 5 seconds (5,000 milliseconds). Experiment with this value to determine how much time you can block the EDT before the GUI feels unresponsive.
-
Program 15.16 is unrealistic because the EDT simply goes to sleep. Normally, a GUI becomes unresponsive because the EDT is performing extensive calculations or doing slow I/O operations. Replace the line that sleeps with a short loop that performs significant calculations. One simple way to spend a lot of computational time is by summing the sines of random numbers, similar to the work done in Example 13.10. How many sines do you need to compute to make the GUI unresponsive for 5 seconds?
-
Take the computationally expensive loop from Exercise 15.22 and use it to replace the line that sleeps in Program 15.17, the
SwingWorkerversion of the program. Does the program become unresponsive if you run it? If possible, run the program on Windows, macOS, and Linux environments. If it’s unresponsive in some environments but not others, why do you think that might be?