20. File I/O
Kira: What are those funny marks?
Jen: This is all writing.
Kira: What’s writing?
Jen: Words that stay, my master said.
20.1. Problem: A picture is worth 1,000 bytes
If you’re familiar with bitmap (bmp) files, you know that they can take
up a lot of space compared to other popular image formats. People often use
a technique called data compression to reduce the size of large files for
storage. There are many different kinds of compression and many which are
tailored to work well on images. Your task is to write a program that will
do a particular kind of compression called run length encoding (RLE), which
we’ll test on bitmaps. The idea behind RLE is simple: Imagine a file as a
stream of bytes. As you look through the stream, replace repeating sequences
of a single byte with a count telling how many times it repeats followed by
the byte that repeats. Consider the following sequence.
215 7 7 7 7 7 7 7 7 7 123 94 94 94 71
Its RLE compressed version could be shown as follows.
1 215 9 7 1 123 3 94 1 71
Since there’s no simple way to keep track of which numbers are counts and which ones are actual bytes of data, we have to keep a count for every byte, even unrepeated ones. In this example, we went from 15 down to 10 numbers, a savings of a third. In the worst case, a file that has no repetition at all would actually double in size after being “compressed” with this kind of RLE. Nevertheless, RLE compression is used in practice and performs well in some situations.
Your job is to write a Java program that takes two arguments from the
command line. The first is either -c for compress or -d for
decompress. The second argument is the name of the file to be compressed
or decompressed. When compressing, append the suffix .compress to the
end of the file name. When decompressing, remove that suffix.
Executing the following on the command line should generate an RLE compressed
file called test.bmp.compress.
java BitmapCompression -c test.bmp
Likewise, executing the following should create an uncompressed file called
test.bmp.
java BitmapCompression -d test.bmp.compress
Be sure to make a backup of the original file (in this case test.bmp) because
decompressing will overwrite a file of the same name.
To perform the compression, go byte by byte through the file. For each
repeating sequence of a byte (which can be as short as a single byte
long), write the length of the sequence as a byte and then the byte
itself into the compressed file. If a repeating sequence is more than
127 bytes, you break the sequence into more than one piece since
the largest value the byte data type can hold in Java is 127. (The
byte type in Java is always signed, giving a range of -128 to 127.)
Decompression simply reads the count then the byte value and writes the
appropriate number of copies of the byte value into the decompressed
file.
20.1.1. Command-line arguments
You might be wondering how to read the command-line arguments such as
-c test.bmp or -d test.bmp.compress. These arguments can’t be read
using Scanner as we read most text. Instead, they’re passed directly into
your program. By this point, you’ve written so many main() methods that you
might have stopped paying attention to their syntax. Remember that main()
methods always take a single parameter of type String[]. We’ve always called
this parameter args in this book, but you’re free to call it whatever you
like.
This array of String values is how command-line arguments are passed into
your program. A Java program invoked by typing
java BitmapCompression -c test.bmp will have an array of length 2 passed in.
The first String stored in this array (args[0]) will be "-c". The second
String stored in this array (args[1]) will be "test.bmp". The operating
system passes in these command-line arguments to the JVM which passes them along
to your program as String values.
Command-line programs often take these arguments to specify which options the
program will be run with. Although they’re useful, we didn’t focus on these
arguments in early chapters partly because they involve arrays and partly because
all arguments, even those that look like numbers, will be passed in as String
values. Furthermore, it’s cumbersome to specify command-line arguments when
using IDEs like Eclipse or IntelliJ.
20.2. Concepts: File I/O
Before you can tackle the problem of compressing, or even reading from and writing to, files, some background on files is necessary. By now, you’ve had many experiences with files: editing Java source files, compiling those files, and running them on a virtual machine, at the very least. You’ve probably done some word processing, looked at photos, listened to music, and watched videos, all on a computer. Each of these activities centers on one or more files. In order to reach these files, you probably had to look through some directories, which are a special kind of file as well. But what is a file?
20.2.1. Non-volatile storage
A computer program is like a living thing, always moving and restless. The variables in a program are stored in RAM, which is volatile storage. The data in volatile memory will only persist as long as there’s electricity powering it. But most programs don’t run constantly, and neither do most computers. We need a place to store data between runs of a particular program. Likewise, we need a place to store data when our computer isn’t turned on. Both scenarios share a common solution: secondary storage such as hard drives, flash drives, and optical media like DVD and Blu-ray discs.
Files are not always stored in non-volatile memory. It’s possible to load entire files into RAM and keep them there for long periods of time. Likewise, all input and output on Unix and Linux systems are viewed as file operations. Nevertheless, the characteristics of non-volatile memory are often associated with file I/O: slow access times and the possibility of errors in the event of inaccessible files or hardware problems.
20.2.2. Stream model
While discussing RLE encoding, we described a file as a stream of bytes, and that’s a good definition for a file, especially in Java. Since Java is platform independent, and different operating systems and hardware will deal with the nitty gritty details of storing files in different ways, we want to think about files as abstractly as possible. Reading from and writing to a stream of bytes is not so different from the other input and output you’ve done so far. For the most part, file I/O will be similar to command-line I/O and, in fact, can use some of the same classes.
Although reading and writing from the files can be like reading from the
keyboard and writing to the screen, there are a few additional complications.
For one thing, you must open a file before you
can read or write. Sometimes opening the file will fail: You could try
to open a file for reading which doesn’t exist or try to open a file
for writing which you don’t have permissions for. When reading data,
you might try to read past the end of the file or try to read an int
when the next item is a String. Unlike reading from the keyboard, you
cannot ask the user to try again if there’s a mistake in input. To deal
with these possible errors, exception handling will accompany many
different file I/O operations in Java.
20.2.3. Text files and binary files
When talking about files, many people divide files into two categories: text files and binary files. A text file can be read by humans. That is, when you open a text file with a simple file reader, it won’t be filled with gibberish and nonsense characters. A Java source file is an excellent example of a text file.
In contrast, a binary file is a file meant only to be read by a computer. Instead of printing out characters meant to be read by a human, the raw bytes of memory for specific pieces of data are written to binary files. To clarify, if we wanted to write the number 2,127,480,645 in a text file, the file would contain the following.
2127480645
However, if we wanted to write the same number in a binary file, the file would contain the following.
~ÎÇE
If you recall, an int in Java uses four bytes of storage. There’s a
system of encoding called the ASCII table which maps each of the 256
(0–255) numerical bytes to a character. The four characters given above
are the extended ASCII representation of the four bytes of the number
2,127,480,645.
In some sense, the idea of a text file is artificial. All files are binary in the sense that they’re readable by a computer. You’ll take different steps and create different objects depending on whether you want to do file I/O in the text or binary paradigms, but the overall process will be similar in either case.
20.3. Syntax: File operations in Java
20.3.1. The File class
A basic class for interacting with files in Java is the File class. A File
object allows you to interact with a file at the operating system level. You
can create a new file, test to see if a file is a directory, find out the size
of a file, and so on. A number of file I/O classes
require a File object as a parameter. To use the File class, import
java.io.File or java.io.*.
To create a File object, you can call the File constructor with a
String specifying the name of the file.
File file = new File("file.txt");Doing so will create a virtual file object associated with the name
file.txt (which might not exist yet) in the working directory of the
Java program. In this case, the extension txt doesn’t have any real
meaning. On many systems, the extension (like pdf or html) is used
by the operating system to guess which application should open the file.
To Java, however, the extension is just part of the file name. A file
name passed to the constructor of a File object can have any number of
periods in it (or none).
A file name without a directory is all well and good, but file systems are
useful in part because of their hierarchical structure. If we want to create a
file in a particular location, we specify the path in the String
before the name of the file.
File file = new File("/homes/owilde/documents/file.txt");In this case, the prefix /homes/owilde/documents/ is the path and
file.txt is still the file name. Each slash ('/') separates a
parent directory from the files or directories inside of it. This path
specifies that we start at the root, go into the homes directory, then
the owilde directory, and then the documents directory. Note that we
can also use a single period (.) in a path to refer to the current
working directory and two periods (..) to refer to a parent directory.
This is one of those sticky places where Java’s trying to be platform
independent, but the platforms each have different needs. The example we
gave above is for a macOS or Linux system. In Windows, the way to specify
the path is slightly different. Creating a similar File object on
Windows system might be done as follows.
File file = new File("C:\\Users\\owilde\\Documents\\file.txt");Then, the path specifies that we start in the C drive, go into the
Users directory, the owilde directory, and then the Documents directory.
Windows systems use a backslash (\) to separate a parent directory from its
children. But in Java a backslash isn’t allowed to be by itself in a
string literal, and so each backslash must be escaped with another
backslash. To simplify things somewhat, Java allows Windows paths to be
separated with regular slashes as well, so we’ll use this style for
the rest of the book.
A further complication is that file and directory names are case sensitive in Linux, aren’t case sensitive in Windows, and could be either in macOS depending on file system settings.
Returning to File objects, there are a number of things we
can do directly. A File object has methods that can test if a file
with the associated name and path exists, if it’s readable, if it’s
writable, and many other things. Because there are so many classes
associated with file I/O and each class has so many methods, now’s a
good time to remind you of the usefulness of the Java API. If you visit
the Java API documentation site,
you can get detailed documentation for the entire standard library, including
file I/O classes.
20.3.2. Reading and writing text files
Once you have a File object, most of its usefulness comes from combining
it with other classes. You’re already familiar with the Scanner
class. The Scanner constructor can take a File object (instead of
System.in), creating a Scanner that reads from a text file instead of the
keyboard.
Scanner in = null;
try {
    in = new Scanner(file);
    while(in.hasNextInt())
        process(in.nextInt());
}
catch(FileNotFoundException e) {
    System.out.println("File " + file.getName() + " not found!");
}
finally { if(in != null) in.close(); }
Assuming that file is linked to a file which the program has read
access to, this block of code will extract int values from the file
and pass them to the process() method. If the file doesn’t exist or
isn’t readable to the program, a FileNotFoundException will be thrown
and an error message printed. Creating a Scanner from a File object
instead of System.in can throw a checked exception, so the try and catch
are needed before the program will compile. Note that you’ll need to import
java.util.Scanner or java.util.* just like any other time you use the
Scanner class.
And that’s all there is to it. After opening the file, using the
Scanner class will be almost the same as before. One difference is
that you should close the Scanner object (and by extension the file)
when you’re done reading from it, as we do in the example. Closing
files is key to writing robust code.
You’ll notice that we put
in.close() in a finally block. Using finally is a good habit for
file I/O. File operations could fail for any number of reasons, but you
will still need to close the file afterward. We put in the null check
in case the file didn’t exist and the reference in never pointed to a
valid object. (We also begin by setting in to null. Otherwise, Java
complains that it might not have been initialized.)
Writing information to a file is similar to using System.out. First,
you need to create a PrintWriter object. Like Scanner, you can
create a PrintWriter object directly from a File object. If we want to
write a list of random numbers to the file we were reading from earlier,
we could do it as follows.
PrintWriter out = null;
try {
    out = new PrintWriter(file);
    Random random = new Random();
    for(int i = 0; i < 100; ++i)
        out.println(random.nextInt());
}
catch(FileNotFoundException e) {
    System.out.println("File " + file.getName() + " not found!");
}
finally { if(out != null) out.close(); }
Again, once you have a PrintWriter object, the methods for outputting
data are just like using System.out. Be sure to import java.io.* in order
to have access to the PrintWriter class.
20.3.3. Reading and writing binary files
We covered text files first because their input and output is similar to command-line I/O. When reading and writing text files, you can visually verify that file reading and writing operations were successful. Although it’s harder to check the contents of binary files, they have other advantages. Data can often be stored more compactly in binary files, as in the example with the integer 2,127,480,645. Even better, Java provides facilities for easily dumping (and later retrieving) primitive data types, objects, and even complex data structures to binary files.
The simplest object for reading input from a binary file is a
FileInputStream object. As with a File object, you can create a
FileInputStream object from a String specifying the file path and name.
FileInputStream in = new FileInputStream("file.bin");Unfortunately, you can’t do much with a FileInputStream object.
Its methods allow you to read single bytes, either one at a time or into an
array as a group. The basic read() method returns the next byte in the file
or a -1 if the end of the file has been reached. Working only at the level of
bytes, we can still write useful code like the following method that prints the
size of a file.
public static void printFileSize(String fileName) {
    FileInputStream in = null;
    try {
        in = new FileInputStream(fileName);
        int count = 0;
        while(in.read() != -1)
            count++;
        System.out.println("File size: " + count + " bytes");
    }
    catch(Exception e) {
        System.out.println("File access failed.");
    }
    finally { try{ in.close(); } catch(Exception e){} }
}
Note the extra try-catch block inside of the finally. Like the
other binary file I/O objects we’ll discuss in this section,
FileInputStream can throw an IOException when closing. Usually, you
won’t need to deal with this exception, but you still must catch it.
Since we’re catching any Exception, we’re saving a little bit of code by
eliminating the null check. If in is null in this example, a
NullPointerException will be thrown and immediately caught, causing no
damage. Catching Exception breaks our rule of never catching exceptions
that are broader than we need, but we only have a single line of code
in our try block with nothing else to do if it fails.
To output a sequence of bytes, you can create a FileOutputStream object.
Its write() methods are the mirror images of the read() methods in
FileInputStream. It would be convenient if there was a way to read
and write any primitive type instead of just byte values, and
DataInputStream and DataOutputStream provide exactly that functionality.
For output, a DataOutputStream chops up primitive data types into their
component bytes and sends those bytes to a FileOutputStream. For input, a
DataInputStream reads a sequence of bytes from a FileInputStream and
reassembles them into whatever kind of primitive data they’re supposed to be.
To create an DataInputStream, you supply a FileInputStream to its
constructor, usually one that you’ve just created on the fly for this purpose.
DataInputStream in = new DataInputStream(new FileInputStream("baseball.bin"));Now, let’s assume that baseball.bin contains baseball statistics. The
first thing in the file is an int indicating the number of records it
contains. Then, for each record, it’ll list home runs, RBI, and
batting average, as an int, an int, and a double, respectively.
Assuming that we’ve opened the file correctly above, we can read these
statistics into three arrays with the following code.
DataInputStream in = null;
try {
	in = new DataInputStream(new FileInputStream("baseball.bin"));
	int records = in.readInt();
	int[] homeRuns = new int[records];
	int[] RBI = new int[records];
	double[] battingAverage = new double[records];
	for(int i = 0; i < records; ++i) {
		homeRuns[i] = in.readInt();
		RBI[i] = in.readInt();
		battingAverage[i] = in.readDouble();
	}
}
catch(IOException e) {
    System.out.println("File reading failed.");
}
finally { try{ out.close(); } catch(Exception e){} }
When opening the file in the FileInputStream constructor, a
FileNotFoundException will be thrown if the file doesn’t exist or is
inaccessible. If the readInt() or readDouble() methods fail, they’ll throw
an IOException. If the DataInputStream object tries to read past the end
of a file, it’ll throw an EOFException exception. If you wanted to deal with
these exceptions separately, you could, but since FileNotFoundException and
EOFException are both children of IOException, a single catch clause
for IOException handles all three.
As expected, the
DataOutputStream methods for writing to a file match DataInputStream
methods for reading from a file. If you substitute write for read,
DataOutputStream methods are almost the same as
DataInputStream methods. Below is a companion piece of code which
assumes that homeRuns, RBI, and battingAverage are filled with
data and writes them to a file.
DataOutputStream out = null;
try {
    out = new DataOutputStream(new FileOutputStream("baseball.bin"));
    out.writeInt(homeRuns.length);
    for(int i = 0; i < homeRuns.length; ++i) {
        out.writeInt(homeRuns[i]);
        out.writeInt(RBI[i]);
        out.writeDouble(battingAverage[i]);
    }
}
catch(IOException e) {
    System.out.println("File writing failed.");
}
finally { try{ out.close(); } catch(Exception e){} }Using DataInputStream and DataOutputStream in this way isn’t
too difficult, but it seems cumbersome. The programmer has the responsibility
to read and write every piece of primitive data separately. It would be
convenient if there was a way to read an entire object at once, including any
references to other objects that it contains. If a tool exists for reading
an entire object, we’d also want a matching tool for writing an entire
object at once.
Such tools can be found in the ObjectInputStream and
ObjectOutputStream classes, respectively. These file I/O objects provide
methods that elegantly allow you to read or write a whole object at a time. To
use them with our baseball data example, we need to define a new class.
import java.io.Serializable;

public class BaseballPlayer implements Serializable {
    private int homeRuns;
    private int RBI;
    private double battingAverage;

    public BaseballPlayer(int homeRuns, int RBI, double battingAverage) {
        this.homeRuns = homeRuns;
        this.RBI = RBI;
        this.battingAverage = battingAverage;
    }

    public int getHomeRuns() { return homeRuns; }
    public int getRBI() { return RBI; }
    public double getBattingAverage() { return battingAverage; }
}
The new class BaseballPlayer encapsulates the three pieces of
information we want. Note that it also implements the interface
Serializable, but it doesn’t seem to implement any special methods to
conform to the interface. We’ll discuss this interface more after we show how
using this new class can simplify file I/O. Our input code will change to
the following.
ObjectInputStream in = null;
try {
    in = new ObjectInputStream(new FileInputStream("baseball.bin"));
    int records = in.readInt();
    BaseballPlayer[] players = new BaseballPlayer[records];
    for(int i = 0; i < players.length; ++i)
        players[i] = (BaseballPlayer)in.readObject();
}
catch(IOException e) {
    System.out.println("File reading failed.");
}
finally { try{ in.close(); } catch(Exception e){} }
The corresponding output will become what follows.
ObjectOutputStream out = null;
try {
    out = new ObjectOutputStream(new FileOutputStream("baseball.bin"));
    out.writeInt(players.length);
    for(int i = 0; i < players.length; ++i)
        out.writeObject(players[i]);
}
catch(IOException e) {
    System.out.println("File writing failed.");
}
finally { try{ out.close(); } catch(Exception e){} }
This process of outputting an entire object at a time is called
serialization. The BaseballPlayer class is very simple, but even
complex objects can be serialized, and Java takes care of almost
everything for you. The only magic needed is for the class that’s
going to be serialized to implement Serializable. There are no methods
in Serializable. It’s just a tag for a class that can be packed up
and stored. The catch is that, if there are any references to other
objects inside of the object being serialized, they must also be
serializable. Otherwise, a NotSerializableException will be thrown
when the JVM tries to perform the serialized output. Many classes are
serializable, including the vast majority of the Java API.
However, objects that have some kind of special system-dependent state,
like a Thread or a FileInputStream object, can’t be serialized. If you
need to serialize a class with references to objects like these, add the
transient keyword to the declaration of each unserializable reference. That
said, these should be few and far between. For BaseballPlayer, adding
implements Serializable was all we needed, and we can still get
more mileage out of serialization! An array can be treated liked an
Object and is also serializable. We can further simplify the input as
shown below.
ObjectInputStream in = null;
try {
    in = new ObjectInputStream(new FileInputStream("baseball.bin"));
    BaseballPlayer[] players = (BaseballPlayer[])in.readObject();
}
catch(IOException e) {
    System.out.println("File reading failed.");
}
finally { try{ in.close(); } catch(Exception e){} }
And the corresponding output code can be simplified as well.
ObjectOutputStream out = null;
try {
    out = new ObjectOutputStream(new FileOutputStream("baseball.bin"));
    out.writeObject(players);
}
catch(IOException e) {
    System.out.println("File writing failed.");
}
finally { try{ out.close(); } catch(Exception e){} }
When you go to write your code, which binary file I/O classes should you use?
It depends on the situation. FileInputStream and FileOutputStream are very
low level. You’ll use those classes to construct DataInputStream,
DataOutputStream, ObjectInputStream, and ObjectOutputStream objects, but
you probably won’t use them on their own unless your application is focused on
byte-level input and output.
If you only want to read and write primitive types, you can use
DataInputStream and DataOutputStream objects. These classes have methods
to read and write all primitive types. Ultimately, all objects are made up of
primitive types, though those primitive types might be buried inside of other
objects. Most languages provide binary I/O tools like DataInputStream and
DataOutputStream, so code using these objects will be similar to code in other
languages that writes individual pieces of primitive data.
Finally, if you want to read and write whole objects (or even arrays of objects)
at a time, ObjectInputStream and ObjectOutputStream are powerful tools.
Using them leverages Java serialization, making the JVM do the work of dividing
up your objects into primitive types and writing them (for output) or
reading that primitive data and reassembling it into objects (for input). Even
complex objects with many (potentially circular) references to other objects,
like linked list classes, can be serialized. The Java implementation of
serialization is smart enough to write each unique object only once and then
refer to it later. This power feels like magic, but serialization has
limitations. Only classes that implement the Serializable interface can
be serialized. Also, serialization carries with it some overhead: the files
must contain additional metadata describing the class being stored. Using
DataInputStream and DataOutputStream can allow you to write only the
necessary member data, resulting in a smaller file. You can also run into
trouble if you make changes to a class. If one version of an object is
serialized and then you try to read that object back after making the smallest
change to the class, your code will fail. One last issue is that Java
serializes objects according to its own rules, making files written in this
way difficult (if not impossible) to use with code written in other languages.
This consideration is not insignificant, since files are often written by one
program and read by another.
The following table summarizes the three approaches to binary I/O we’ve discussed. Be sure to consult each class’s documentation for more information.
| Class | Use | Purpose | Limitations |
|---|---|---|---|
|
Input |
Simplest binary I/O |
Can only read and write |
|
Output |
||
|
Input |
Binary I/O for primitive types |
Can’t read and write whole objects |
|
Output |
||
|
Input |
Powerful binary I/O for all types |
Depends on Java serialization and can’t work with files created in other ways |
|
Output |
20.3.4. Using JFileChooser
One of the more tedious aspects of working with files in command-line programs
is typing the name of the file correctly. Although most OS terminals have
time-saving autocomplete features to help users choose the right file name,
typing the name of a file directly into a prompt so that it can be read by
a Scanner object is error prone. Navigating long directory paths can also
be a headache when using a command-line interface.
Indeed, most users are used to selecting files to open or to save via a GUI
file chooser instead of typing file names explicitly. The Java Swing library
provides such a file chooser called JFileChooser.
We discussed fully featured GUI programs in Chapter 15, but like the
JOptionPane class covered in Chapter 7,
JFileChooser can be used with or without a complex GUI.
Unlike the JOptionPane class whose functionality is accessed through static
methods, you must create a JFileChooser object to use it.
JFileChooser chooser = new JFileChooser();Once you’ve created the JFileChooser object, you can call either the
showOpenDialog() method to show a dialog to open existing files or the
showSaveDialog() to save a potentially new file. The dialog looks similar
in either case, with only minor differences such as title and buttons names.
int result = chooser.showOpenDialog(null);Both methods take a Component object as an argument. If you’re creating a
GUI program, you can pass in a JFrame or a JDialog for this argument to pop
up a modal file chooser dialog that must be dealt with before returning control
to the parent frame or dialog. If your program doesn’t otherwise use a GUI,
you can pass in null.
Both methods also return an int value indicating the result of user input.
A return value of JFileChooser.APPROVE_OPTION means that the user selected a
file. The value JFileChooser.CANCEL_OPTION means that the user canceled
instead of picking a file. Finally, JFileChooser.ERROR_OPTION means some
error occurred.
Once the user has selected a file for opening or for saving, you can call the
getSelectedFile() method to retrieve the File that the user selected.
File file = chooser.getSelectedFile();If the user canceled or an error occurred, this File object could be null.
In many cases, a programmer will want to focus the user on files of a certain
kind. For example, a program that plays audio files might display only
files that have extensions associated with audio formats such as wav, mp3,
and flac. To include this functionality, you can create a
FileNameExtensionFilter object and set it as a file filter on your
JFileChooser.
FileNameExtensionFilter filter = new FileNameExtensionFilter("Audio", "wav", "mp3", "flac");
chooser.setFileFilter(filter);
The first argument to the FileNameExtensionFilter constructor is a
user-friendly description of the kinds of files displayed by the filter. After
the description, the constructor takes a variable number of arguments, each of
which gives one of the included file extensions. Extensions are case
insensitive and should not include a dot (.) at the beginning. You should set
the file filter before displaying a dialog with either showOpenDialog() or
showSaveDialog().
FileNameExtensionFilter covers most of what people want from a file filter,
but it’s possible to create your own class that extends FileFilter if you
need to filter files based on more complex criteria.
Next, we’ll give a short example that uses a JFileChooser.
JFileChooserThe short program below allows a user to select a file using
JFileChooser. Only image files with jpg or png extensions will be
displayed. Once the file has been selected, the program will print out the
number of bytes of storage that the file uses.
JFileChooser.import javax.swing.JFileChooser; (1)
import javax.swing.filechooser.FileNameExtensionFilter;
import java.io.File;
public class FileChooserExample {
public static void main(String[] args) {
JFileChooser chooser = new JFileChooser(); (2)
FileNameExtensionFilter filter = new FileNameExtensionFilter("Images", "jpg", "png");
chooser.setFileFilter(filter); (3)
int result = chooser.showOpenDialog(null); (4)
if(result == JFileChooser.APPROVE_OPTION) { (5)
File file = chooser.getSelectedFile();
if(file != null && file.exists()) { (6)
long size = file.length();
System.out.println("The file contains " + size + " bytes.");
}
else
System.out.println("The file doesn't exist.");
}
else
System.out.println("The user probably canceled.");
}
}| 1 | Imports are needed for the JFileChooser, the FileNameExtensionFilter,
and the File object itself. |
| 2 | First, we create the JFileChooser object. |
| 3 | Next, we create and then set a file filter appropriate for image files. |
| 4 | We show the open dialog to allow the user to select a file. |
| 5 | If the user selected a file rather than canceling, we get the File
object from the file chooser. |
| 6 | If the file exists, we get its length in bytes and print that out. |
If the file didn’t exist or the user hit cancel, we print appropriate messages in those cases as well.
Figure 20.1 shows the dialog displayed by this program.
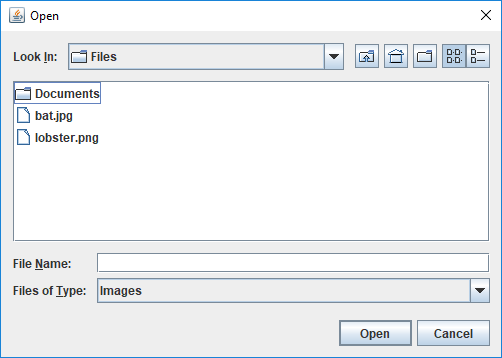
JFileChooser showing an open dialog.Note that the purpose of JFileChooser is to allow users to select a file. It
doesn’t guarantee that the file exists or that the user has rights to read
from the file or to write to it. Most commercial software asks the user if
he or she wants to overwrite an existing file when saving. JFileChooser
doesn’t have that functionality built in, requiring additional program logic to
to prompt the user if an existing file is about to be overwritten.
Like most of the Swing library, JFileChooser has many options and features
that we don’t have time to cover. Its display can be customized, and it can be
configured to interact with the file system in a number of ways, such as
displaying only normal files, displaying only directories, or both. There are
even settings that allow the user to select multiple files at once.
20.4. Examples: File examples
Let’s return to the File class and look at another example of how to
use it. It’s often useful to know the contents of a directory. At the
Windows command prompt, this is usually done using the dir command; in
Linux and macOS, the ls command is generally used. In a few lines of
code, we can write a directory listing tool which lists all the files in
a directory, the date each file was last modified, and whether or not a file
is a directory.
import java.io.*;
import java.text.*;
import java.util.*;

public class Directory {
    public static void main(String[] args) {
        File directory = new File(".");			(1)
        File[] files = directory.listFiles();	(2)
        for(File file: files) {
            System.out.print(DateFormat.getDateInstance().format(
                new Date(file.lastModified())) + "\t");	(3)
            if(file.isDirectory())						(4)
                System.out.print("directory");
            else
                System.out.print("\t");
            System.out.println("\t" +  file.getName());	(5)
        }
    }
}| 1 | The code first creates a File object using "." to
specify the current working directory. |
| 2 | The listFiles() method returns an array of File objects which we then
iterate over. |
| 3 | We call
lastModified() on each file to get its date, |
| 4 | isDirectory() to see if it’s a directory, |
| 5 | and finally print the name given by getName(). |
The output for this program might look like the following.
Aug 5, 2019                     AreaFromRadiusBinary.java
Aug 1, 2019                     AreaFromRadiusText.java
Aug 5, 2019                     BaseballPlayer.java
Aug 5, 2019                     BitmapCompression.java
Aug 5, 2019                     ConcurrentFileAccess.java
Aug 8, 2019                     Directory.class
Aug 8, 2019                     Directory.java
Aug 1, 2019                     FileChooserExample.java
Aug 8, 2019     directory       Images
Aug 5, 2019                     areas.bin
Aug 5, 2019                     areas.txt
Aug 5, 2019                     radiuses.bin
Aug 5, 2019                     radiuses.txt
Now, let’s look at a data processing application of files. Let’s assume
that there’s a file called radiuses.txt which holds the radiuses of a
number of circles formatted as text, one on each line of the file. It’s
our job to read each radius r, compute the areas of each circle using the
formula Area = πr2, and write those areas to a file called areas.txt.
import java.io.*;
import java.util.*;

public class AreaFromRadiusText {
    public static void main(String[] args) {
        File inFile = new File("radiuses.txt");
        File outFile = new File("areas.txt");
        Scanner in = null;
        PrintWriter out = null;
        try {
            in = new Scanner(inFile);		(1)
            out = new PrintWriter(outFile);	(2)
            while(in.hasNextDouble()) {		(3)
                double radius = in.nextDouble();				(4)
                out.format("%.3f%n", Math.PI*radius*radius);	(5)
            }
        }
        catch(FileNotFoundException e) { 	(6)
            System.out.println(e.getMessage());
        }
        finally { 							(7)
            if(in != null) in.close();
            if(out != null) out.close();
        }
    }
}| 1 | First, we create a Scanner to read text from a file. |
| 2 | Next, we create a PrintWriter to write text to a file. |
| 3 | We continue reading as long as there’s another piece of text formatted
as a legal double. |
| 4 | We read in the double, just as we would from a user typing on the
keyboard. |
| 5 | We use the format() method to print out a double formatted with exactly
three digits after the decimal point followed by a newline, just as we’ve used
System.out.format() in the past. |
| 6 | As is typical with file I/O, we have to catch exceptions. A
FileNotFoundException would have been thrown if either file was inaccessible. |
| 7 | In the finally block, we close both files. It’s vitally important to
close output files to ensure that all their data is actually written to disk. |
Perhaps the input file radiuses.txt contains the following 10 values.
33.675
4.156
8.608
60.350
86.501
78.581
23.935
2.263
26.827
73.358
Then, the output file areas.txt would be filled with these corresponding
10 values. Note that formatting the output to have three digits after the
decimal point is easier to read, but it loses some precision.
3562.584
54.263
232.785
11442.065
23506.725
19399.252
1799.769
16.089
2260.966
16906.155
The previous class did all of its input and output with text files. We’ll
also implement this program to read from a binary file called radiuses.bin
and write to a binary file called areas.bin.
import java.io.*;

public class AreaFromRadiusBinary {
    public static void main(String[] args) {
        File inFile = new File("radiuses.bin");
        File outFile = new File("areas.bin");
        DataInputStream in = null;
        DataOutputStream out = null;
        try {
            in = new DataInputStream(new FileInputStream(inFile));		(1)
            out = new DataOutputStream(new FileOutputStream(outFile));	(2)
            while(true) {	(3)
                double radius = in.readDouble();
                out.writeDouble(Math.PI*radius*radius);
            }
        }
		catch(EOFException e) {} // End of file reached (4)
        catch(IOException e) {
            System.out.println(e.getMessage());
        }
        finally {
            try { in.close(); } catch(Exception e){}
            try { out.close(); } catch(Exception e){}
        }
    }
}| 1 | We change the Scanner from the text version of this program to a
DataInputStream. |
| 2 | We change the PrintWriter to a DataOutputStream. |
| 3 | We make what appears to be the strange choice of changing the while
loop to an infinite loop. We do this because the easiest way to see if there’s
any more data in a binary file is to keep reading until an
EOFException is thrown. |
| 4 | When the EOFException is thrown, we do nothing to handle it because, in
this case, it’s just a signal to stop reading. |
20.5. Solution: A picture is worth 1,000 bytes
Now, we’ll give the solution to the problem posed at the beginning of
the chapter. First, let’s look at the class definition and main()
method.
import java.io.*;

public class BitmapCompression {
    public static void main(String[] args) {
		if(args.length != 2)					(1)
			System.out.println("Usage: java BitmapCompression (-c|-d) file");
		else {
			DataInputStream in = null;
			try {
				in = new DataInputStream(new FileInputStream(args[1])); (2)
				if(args[0].equals("-c"))		(3)
					compress(in, args[1]);
				else if(args[0].equals("-d"))
					decompress(in, args[1]);
			}
			catch(FileNotFoundException e) {	(4)
				System.out.println("File not found: " + e.getMessage());
			}
			finally { try{ in.close(); } catch(Exception e){} } (5)
		}
}| 1 | We first check that there are exactly two command-line arguments. Otherwise, our program will crash when we try to access invalid array locations. For the wrong number of arguments, we print a usage message. |
| 2 | If we have the right number of arguments, we open a DataInputStream
based on the file named passed as the second command-line parameter. |
| 3 | Then, we either compress or decompress the file depending on which switch was passed as the first command-line parameter. |
| 4 | The catch will deal with the FileNotFoundException by printing an
appropriate error message. |
| 5 | Note the usual finally where the file is closed, including the inner
try-catch blocks needed to safely close binary files. |
    public static void compress(DataInputStream in, String file) {
        DataOutputStream out = null;
        try {
			String compressed = file + ".compress";
            out = new DataOutputStream(new FileOutputStream(compressed)); (1)
			byte current = 0;
			int count = 1;
			try {
				current = in.readByte(); 		(2)
				while(true) {
					byte temp = in.readByte(); 	(3)
					if(temp == current && count < 127)
						count++;				(4)
					else {						(5)
						out.writeByte(count);
						out.writeByte(current);
						count = 1;
						current = temp;
					}
				}
			}
			catch(EOFException e) { // Last sequence of bytes (6)
				out.writeByte(count);
				out.writeByte(current);
			}
        }
        catch(IOException e) {	(7)
			System.out.println("Compression failed: " + e.getMessage());
        }
        finally { try { out.close(); } catch(Exception e){} }
}| 1 | In the compress() method, we first open a new DataOutputStream for
a file named the same as the input file with .compress tacked on the
end. |
| 2 | We read in the first byte of data. |
| 3 | Then, we keep reading bytes of data from the input file. |
| 4 | As long as we keep seeing the same byte, we increment a counter. |
| 5 | When we run into a new byte (or when we reach the limit of 127 of the same consecutive byte), we write the count and the byte we’ve been reading and move on, resetting the counter. |
| 6 | When an EOFException is thrown, we’ve reached the end of the file.
Because of the way our code is structured, we’ll always have at least one byte
(and possibly a long sequence of matching bytes) that we haven’t yet written
to the file. Consequently, we have to write the counter and the current byte
to finish. |
| 7 | The method finishes
with the usual catch and finally blocks needed to catch errors and
safely close the output file. |
    public static void decompress(DataInputStream in, String file) {
        DataOutputStream out = null;
        try {
			String original = file.substring(0, file.lastIndexOf(".compress")); (1)
            out = new DataOutputStream(new FileOutputStream(original)); (2)
            while(true) {
				int count = in.readByte(); (3)
                byte temp = in.readByte();
                for(int i = 0; i < count; i++)
                    out.writeByte(temp);
            }
        }
		catch(EOFException e) {} // Input finished (4)
        catch(IOException e) {	(5)
			System.out.println("Decompression failed: " + e.getMessage());
        }
        finally { try{ out.close(); } catch(Exception e){} }
    }
}| 1 | The decompress() method is simpler than compress(). It begins
by finding the original name of the file by removing .compress. Note that
this code will crash if the file being decompressed doesn’t end with
.compress. |
| 2 | Then, we open a new DataOutputStream for a file with the original name
we’ve found. |
| 3 | Next, we read a counter, read a byte value, and write the byte value as many times as the count specifies. |
| 4 | As before, an EOFException signals the end of the input file. |
| 5 | An additional catch and finally deal with errors and close the output
file. |
20.6. Concurrency: File I/O
By now, you’ve seen threads behave in unpredictable ways because of the way they’re reading and writing to shared variables. Isn’t a file a shared resource as well? What happens when two threads try to access a file at the same time? If both threads are reading from the file, everything should work fine. If the threads are both writing or doing a combination of reading and writing, there can be problems.
As we mentioned in Section 20.3, file operations are OS dependent. Although Java tries to give a uniform interface, different system calls are happening at a low level. Consequently, the results may be different as well.
Consider the following program that spawns two threads that both print a
series of numbers to a file called concurrent.out. The first thread
prints the even numbers between 0 and 9,999 while the second thread
prints the odd ones.
import java.io.*;

public class ConcurrentFileAccess implements Runnable {
    private boolean even;

    public static void main(String args[]) {
        Thread writer1 = new Thread(new ConcurrentFileAccess(true)); (1)
        Thread writer2 = new Thread(new ConcurrentFileAccess(false));
        writer1.start(); (2)
        writer2.start();
    }

    public ConcurrentFileAccess(boolean even) {
        this.even = even;
    }

    public void run() {
        PrintWriter out = null;
        int start = even ? 0 : 1; (3)
        try {
			out = new PrintWriter(new File("concurrent.out")); (4)
            for(int i = start; i < 10000; i += 2) (5)
                out.println(i);
        }
        catch (FileNotFoundException e) {
            System.out.println("concurrent.out not found!");
        }
        finally { if(out != null) out.close(); } (6)
    }
}| 1 | The code in this program should have few surprises. The main() method
creates two Thread objects from ConcurrentFileAccess objects,
each with a different value for its even field. |
| 2 | Then, the main()
method starts the threads running. |
| 3 | In each thread’s run() method, it first decides on a starting point of
0 or 1 depending on whether it’s supposed to be even or odd. Note the use of
the ternary operator. |
| 4 | Each thread opens the file concurrent.out. |
| 5 | Then, it starts printing out even or odd numbers, depending on its starting point. |
| 6 | Afterward, each thread closes the file and ends. |
What do you expect the file concurrent.out to look like after the
program’s completed? Run it several times, on Windows, Linux, and macOS
systems if you can. The file might contain runs switching back
and forth between even numbers and odd numbers, but it’s likely that many
numbers, often about half, will be missing.
Why are half the numbers getting lost? When you open a file for writing, it overwrites the contents of the file. Thus, entire sequences of numbers are getting saved and then lost. We can change this behavior by changing the line below.
out = new PrintWriter(new File("concurrent.out"));We replace it with the following.
out = new PrintWriter(new FileOutputStream("concurrent.out", true));The PrintWriter constructor that takes a File object actually calls another
constructor internally that builds an output stream object. Instead, we can
pass in a FileOutputStream object created with a second boolean parameter
set to true. Doing so creates a FileOutputStream stream (and consequently a
PrintWriter) whose output will be appended to the file instead of
overwriting it.
After this change, what does the file look like when we run the program?
Since we’re going to append to the file instead of overwriting, make sure that
you delete concurrent.out before running the program again. As usual, the
file might look different on different systems. The file probably contains long
runs of numbers from each thread. In fact, it’s possible to have the complete
output from one thread followed by the complete output from the other.
For performance reasons, file operations are usually done in batches.
Instead of writing each number to the file as the thread produces it,
output is usually stored in a buffer which is written as a whole. By calling
out.flush() after each out.println() call, we could flush
the buffer to the file after each number is generated. Doing so won’t
be as efficient, but it may give us some insight into how concurrent
writes on files work.
Using flushes, the output from the two threads should be thoroughly intermixed. On a Windows machine, if you copy the data from the file and sort it, it’s possible that you’ll see some numbers missing. This lost output is similar to situations where updates to variables were lost because they were overwritten by another thread. On the other hand, most Linux systems have better concurrent file writing and won’t lose any numbers. (Even on Linux, it’s possible for a number to be printed in the middle of another number, but no digits should be lost.)
Under ideal circumstances, no two threads or processes should be writing
to the same file. However, this situation is sometimes unavoidable, as
with a database program that must support concurrent writes for the sake
of speed. If you need to enforce file locking, you can prevent threads
within your own program from accessing a file concurrently by using
normal Java synchronization tools. If you expect other programs to
interact with the same files that your program will use, Java provides a
FileLock class which allows the user to lock up portions of a file. As
with everything file related, FileLock is dependent on the underlying
OS and might behave differently on different systems. Also, FileLock
is a tool from the Java Non-blocking I/O (NIO) library, which provides
many impressive features but views I/O in a significantly different way from
the file I/O operations discussed in this chapter.
20.7. Exercises
Conceptual Problems
-
What’s the difference between volatile and non-volatile memory? Which is usually associated with files and why?
-
What’s the difference between text and binary files? What are the pros and cons of using each?
-
We can define compression ratio to be the size of the uncompressed data in bytes divided by the size of the compressed data in bytes. What’s the theoretical maximum compression ratio you could get out of the RLE encoding we used? What’s the theoretical lowest compression ratio you could get out of the RLE encoding we used?
-
What’s serialization in Java? What do you have to do to serialize an object?
Programming Practice
-
Write methods with the following signatures.
-
public static int readInt(FileInputStream in) -
public static long readLong(FileInputStream in) -
public static short readShort(FileInputStream in)
In each case, the method should read the appropriate number of bytes (4 for
int, 8 forlong, and 2 forshort) using theFileInputStreamobject and reassemble those bytes into the integer type specified. Your methods should be compatible with integers written by aDataOutputStreamobject. Note that such data is written in big-endian format. In other words, the first byte of data corresponds to the most significant byte in an integer, the second byte of data corresponds to the second-most significant byte, and so on. -
-
Program 20.5 from Example 20.3 computes the areas of circles whose radiuses are given as
doublevalues stored in a binary file. Although we provided a sample text file, we didn’t show a sample binary file since the contents would look like gibberish. Write a program that reads a file filled withdoublevalues stored as text and writes those same values into another file, storing thedoublevalues in binary. Afterward, you should be able to convert our sample text file into a sample binary file that can be used with Program 20.5. -
Re-implement the RLE bitmap compression program from Section 20.5 using only
FileInputStreamandFileOutputStreamfor file input and output. In some ways, doing so is simpler since you only needbyteinput and output for this program. -
Update the RLE bitmap compression program from Section 20.5 to use
JFileChooserto allow the user to select a file with a GUI instead of using command-line arguments. -
Re-implement the maze solving program from Section 19.5 to ask the user for a file instead of reading from standard input.
-
An HTML file contains many tags such as
<p>, which marks the beginning of a paragraph, and</p>, which marks the end of a paragraph. A lesser known feature of HTML is that ampersand (&) can mark special HTML entities used to produce symbols on a web page. For example,πis the entity for the Greek letter π. Because of these features of the language, raw text that’s going to be marked up in HTML should not contain less than signs (<), greater than signs (>), or ampersands (&).Write a program that reads in an input text file specified by the user and writes to an output text file also specified by the user. The output file should be exactly the same as the input file except that every occurrence of a less than sign should be replaced by
<, every occurrence of a greater than sign should be replaced by>, and every occurrence of an ampersand should be replaced by&. -
Write a program that prompts the user for an input text file. Open the file and read each word from the file, where a word is defined as any
Stringmade up only of upper- and lowercase letters. You can use thenext()method in theScannerclass to break up text by whitespace, but your code will still need to examine the input character by character, ending a word when any punctuation or other characters are reached. Store each word (with a count of the number of times you find it) in a binary search tree such as those described in Example 19.10. Then, traverse the tree, printing all the words found (and the number of times found) to the screen in alphabetical order. -
Expand the program from Exercise 20.12 so that it also prompts for a second file containing a dictionary in the form of a word list with one word on each line. Store the words from the dictionary in another binary search tree. Then, for each word in the larger document that you can’t find in the dictionary tree, add it to a third binary search tree. Finally, print out the contents of this third binary search tree to the screen, and you will have implemented a rudimentary spell checker. You can test the quality of your implementation by using a novel from Project Gutenberg and a dictionary file from an open-source spell checker or a Scrabble word list.
-
Files can become corrupted when they’re transferred over a network. It’s common to make a checksum, a short code generated using the entire contents of a file. The checksum can be generated before and after file transmission. If both of the checksums match, there’s a good chance that there were no transmission errors. Of course, there can be problems sending checksums, but checksums are much smaller and therefore less likely to be corrupted. Modern checksums are often generated using cryptographic hash functions, which are more complex than we want to deal with here. An older checksum algorithm works in the following way. Although we use mathematical notation, the operations specified below are integer modulus and integer division.
-
Add up the values of all the bytes, storing this sum in a
longvariable -
Set sum = sum mod 232
-
Let r = (sum mod 216) + (sum ÷ 216)
-
Let s = (r mod 216) + (r ÷ 216)
-
The final checksum is s
Remember that finding powers of 2 is easy with bitwise shifts. Write a program that opens a file for binary reading using
FileInputStreamand outputs the checksum described. On Linux systems, you can check the operation of your program with thesumutility, using the-soption. The following is an example of the command used on a file calledwombat.dat. The first number in the output below it,6892, is the checksum. -
sum -s wombat.dat
6892 213 wombat.dat
Experiments
-
Reading single bytes using either
FileInputStreamorDataInputStreamis slow. It’s much faster to read a block of bytes all at once. Re-implement the RLE bitmap compression program from Section 20.5 using theint read(byte[] b)method from theDataInputStreamclass, which tries to fill the arraybwith as manybytevalues as it can. If there are enough bytes left in the file, the array will be filled completely. If the array is longer than the remaining bytes, only the first part of the array will contain valid bytes. In either case, this method will return the number ofbytevalues successfully read into the array.Using a
bytearray of length 1,024, time the original program against the new version on files with sizes of about 500 KB, 1 MB, and 2 MB. There’s also avoid write(byte[] b, int off, int len)method inDataOutputStreamthat can write an entire array ofbytevalues at once. Using it for output would further increase the speed of your program at the price of greater complexity. -
Write the RLE bitmap compression program from Section 20.5 in parallel so that a file is evenly divided into as many pieces as you have threads, compressed, and then each compressed portion is output in the correct order. Compare the speed for 2, 4, and 8 threads to the sequential implementation. Are any of the threaded versions faster? Why or why not? Run some experiments to see how long it takes to read 1,000,000 bytes from a file compared to the time it takes to compress 1,000,000 bytes which are already stored in an array.